Oracle database must be there
- JDK 7 must be there for 11.1.1.9.2 (initially it was jdk8 for me and I faced issues)
- Setup loop back adapter and host file name:
- setup env variables: path and java_home
- java -d64 –version
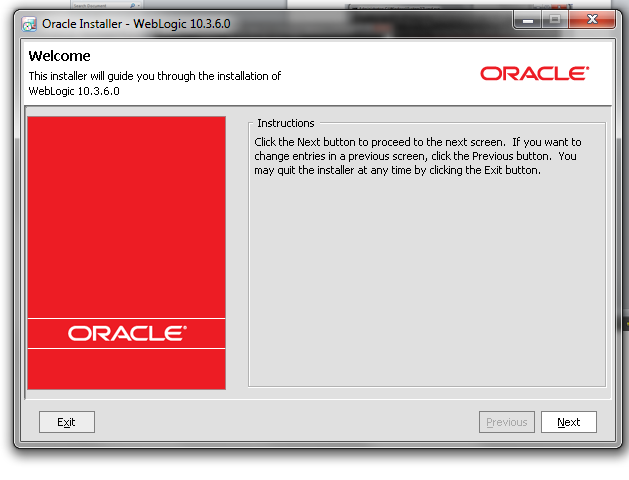
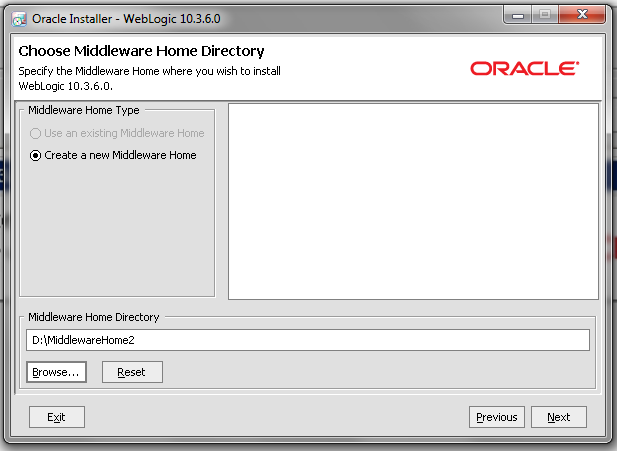
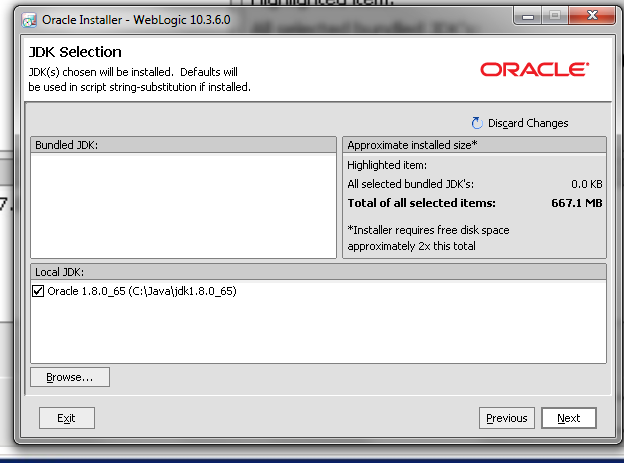
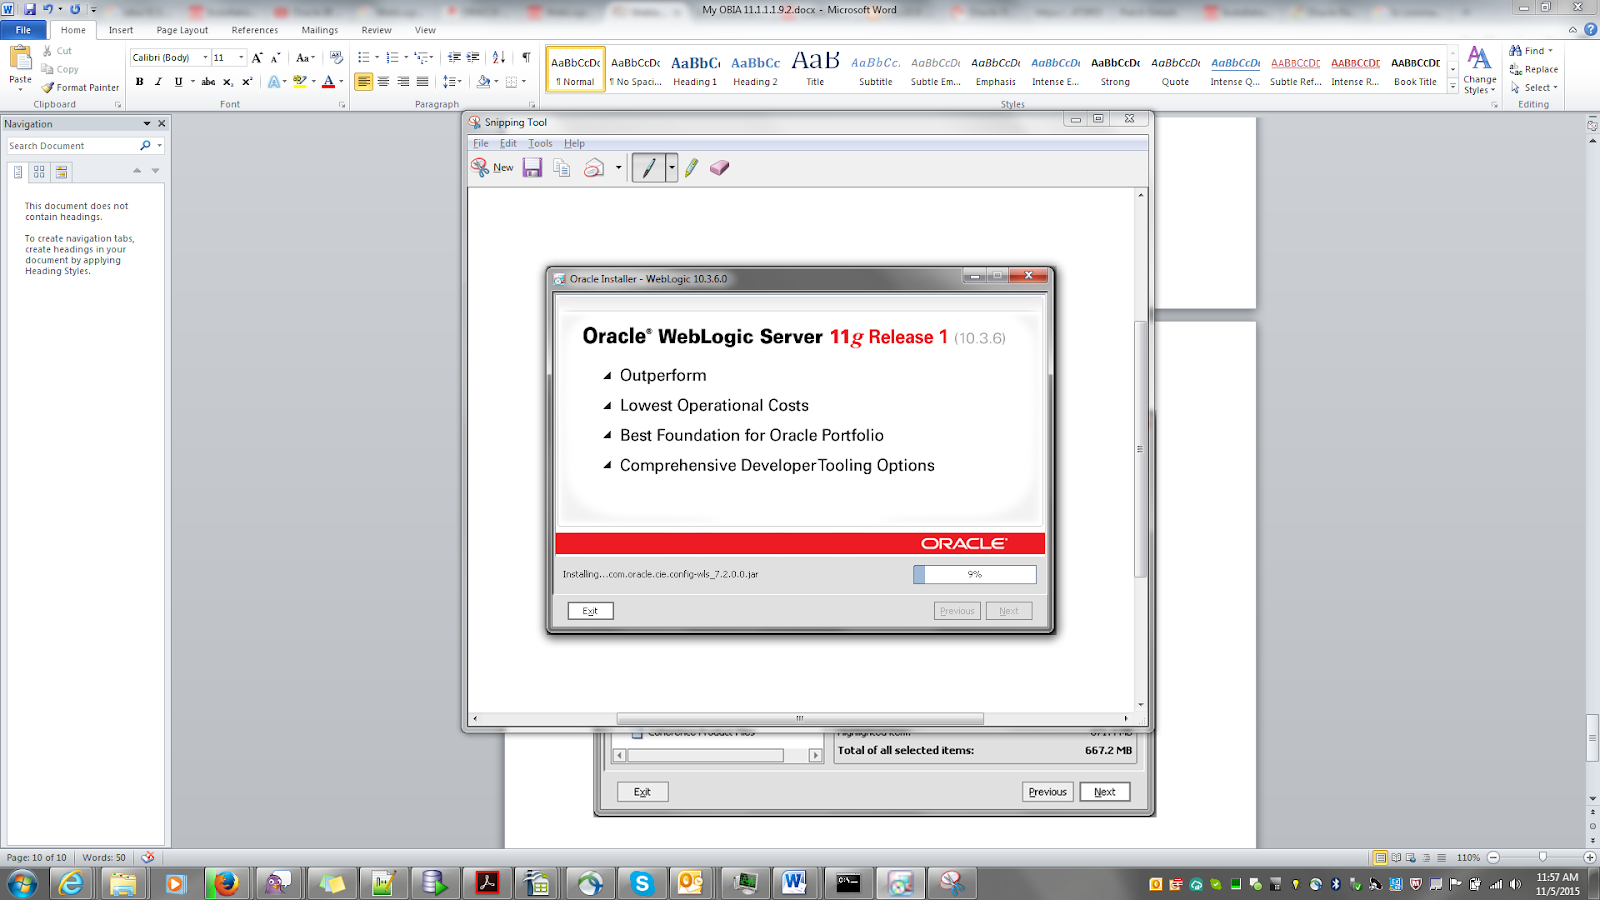
Installing Weblogic Server 10.3.6
Set the environment variable:
Windows:
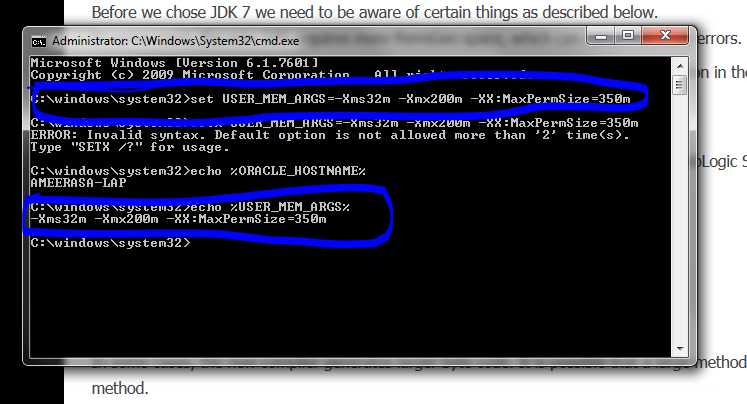
Check whether appropriate java heap space issue is there or not.I have given the below value.
set USER_MEM_ARGS=” -Xms256m -Xmx1024m -XX:MaxPermSize=512m”
UNIX:
set USER_MEM_ARGS=” -Xms256m -Xmx1024m -XX:MaxPermSize=512m”
export MEM_ARGS
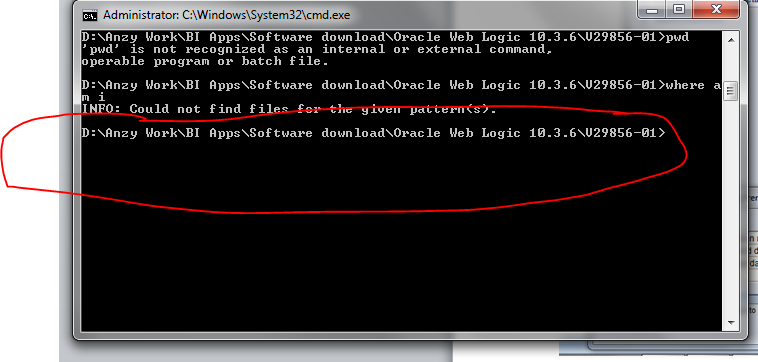
Navigate to Web logic extracted directory:
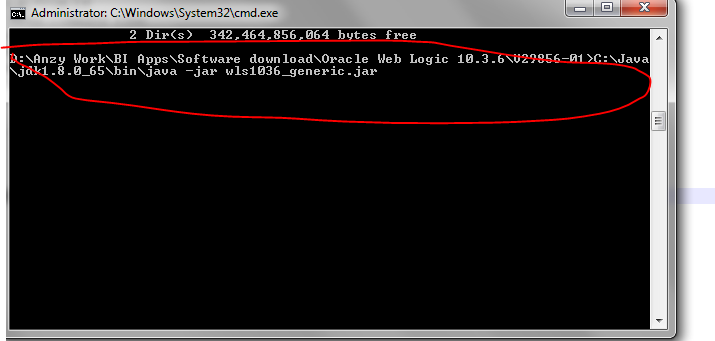
Invoke the installation jar as given below using the jdk 8:


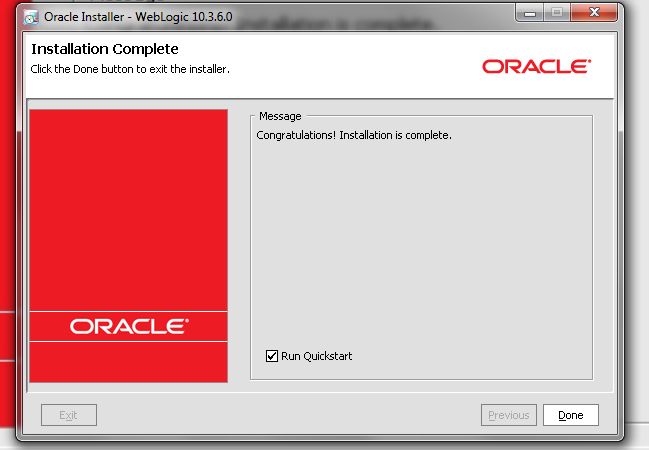
NB: Run Quick Start is not required.
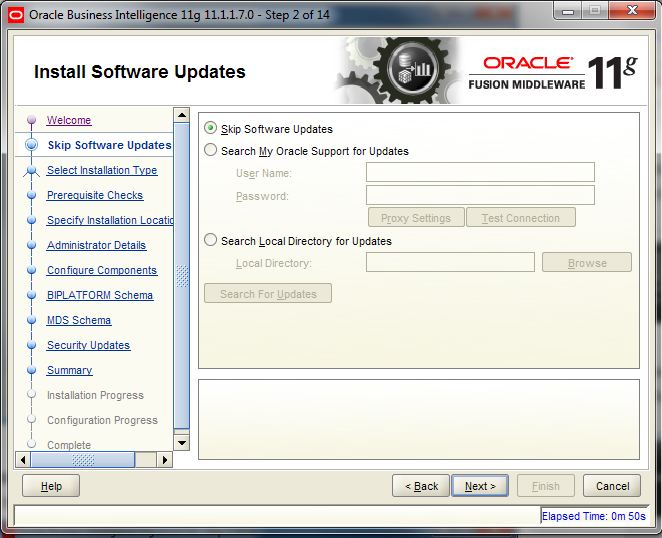
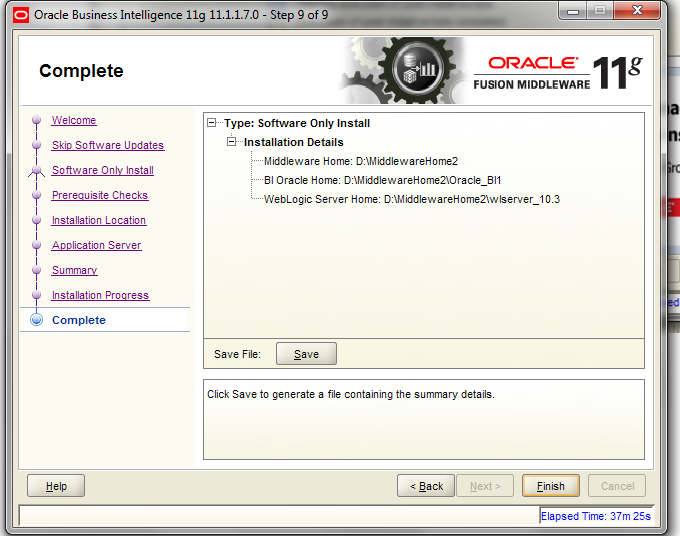
OBIEE Installation
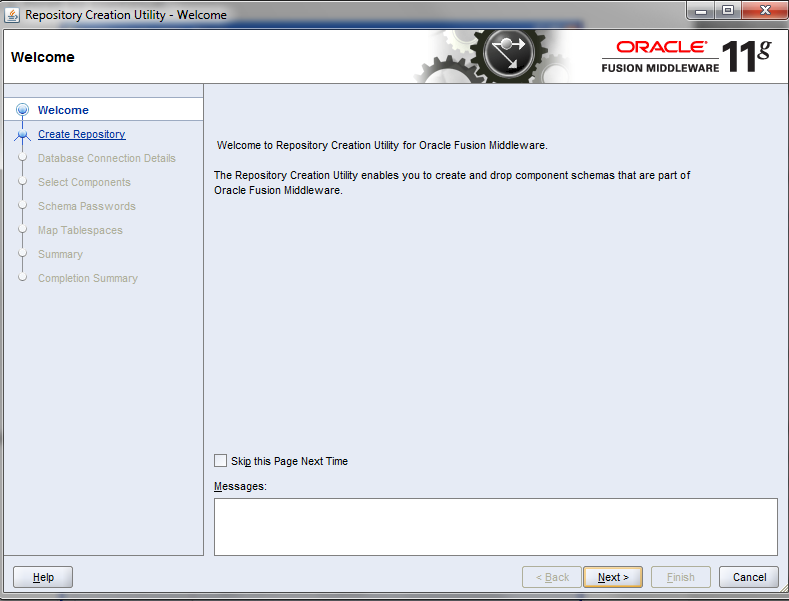
REPOSITORY CREATION FOR OBIEE 11.1.1.7
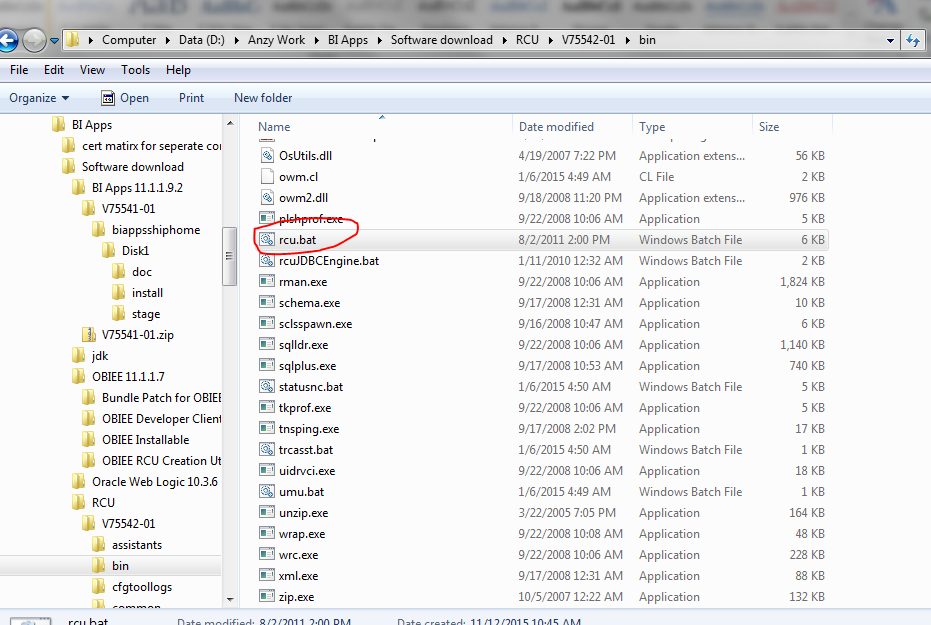
Unzip the RCU installation zip file and navigate to rcuHome/Bin directory and click on the rcu.bat file

NB:I faced an issue at this step. The RCU Creation rcu.bat file was located in a location where the path contained spaces viz; D:\Anzy Work\BI Apps\Software download\RCU; so when RCU.bat was run it popped up an error saying D:Anzy can’t be identified. Then I copied the executable to a location where there was no space and then the installer popped up.:)

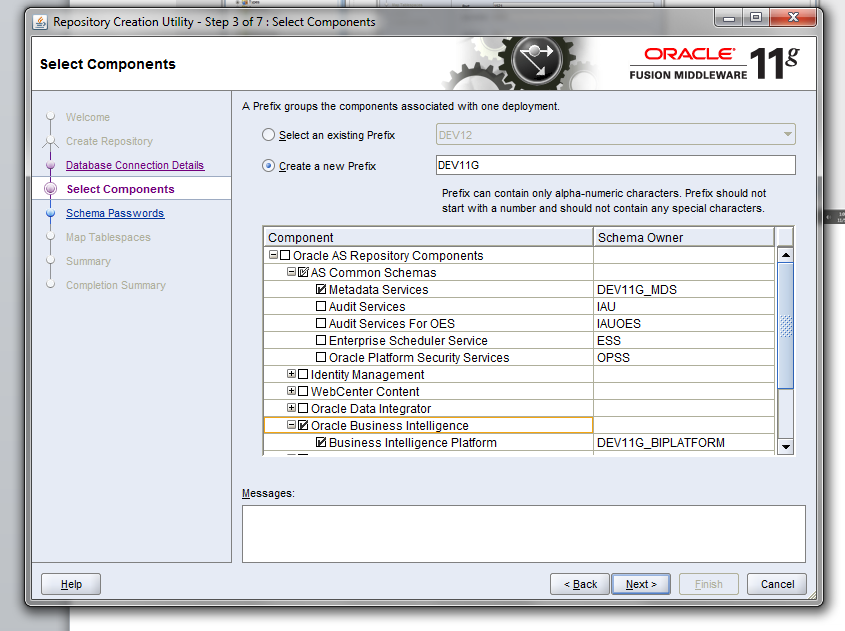
At the Select Components screen, select Oracle Business Intelligence so that the Business Intelligence Platform, and theMetadata Services options are pre-selected for you.
Do not select Oracle Data Integrator as a second Oracle BI Applications 11.1.1.7.1-specific Repository Creation Utility will do that later on.


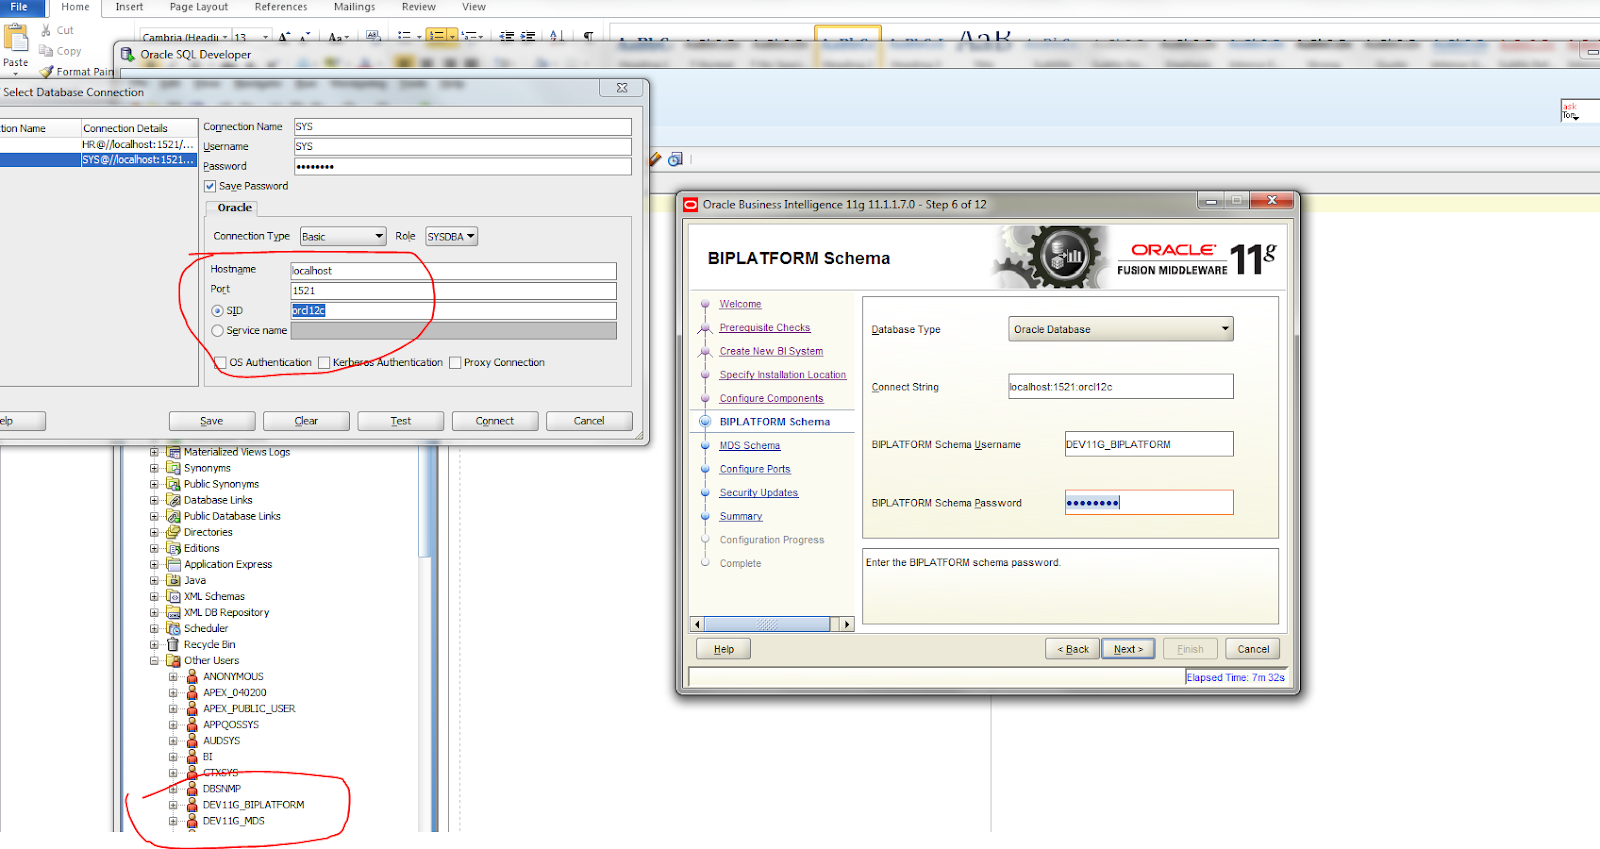
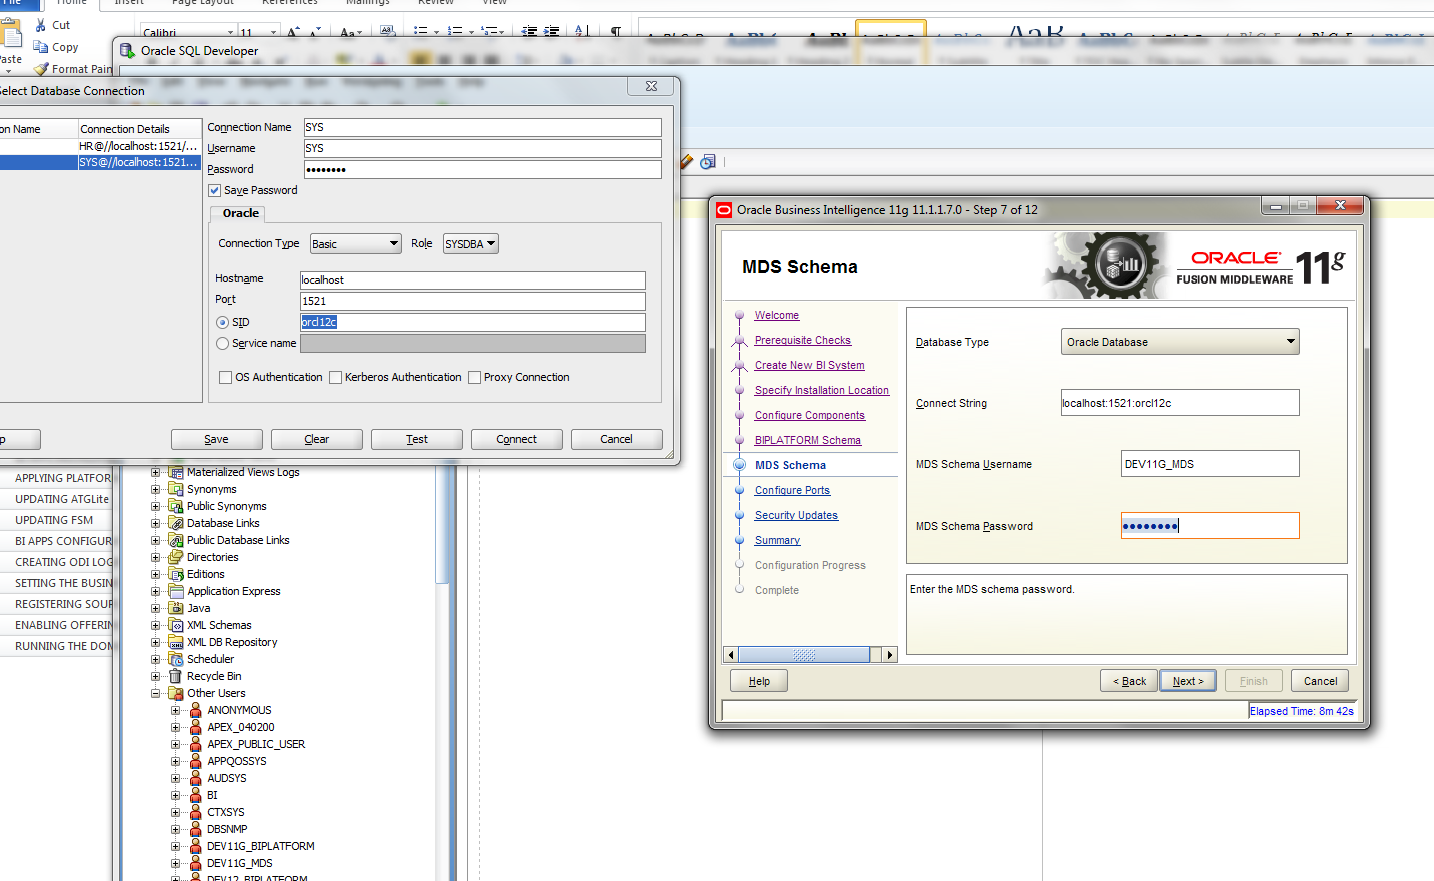
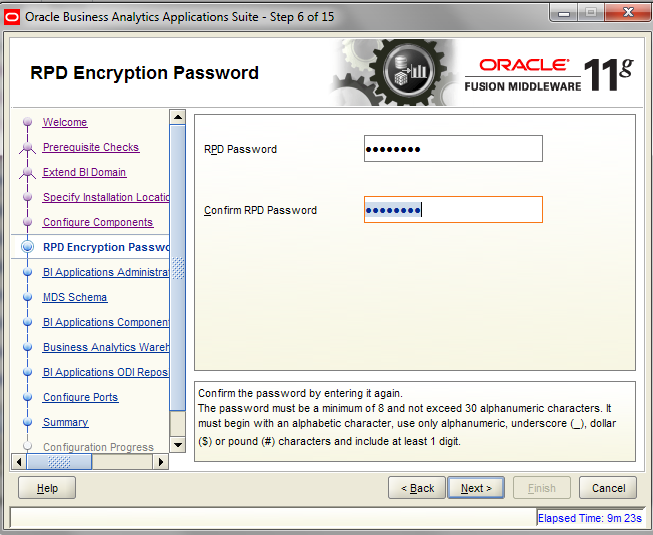
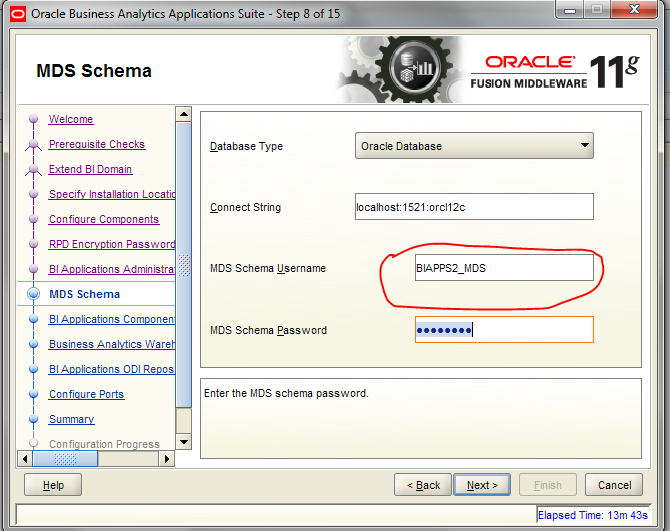
Schema Password:
welcome1


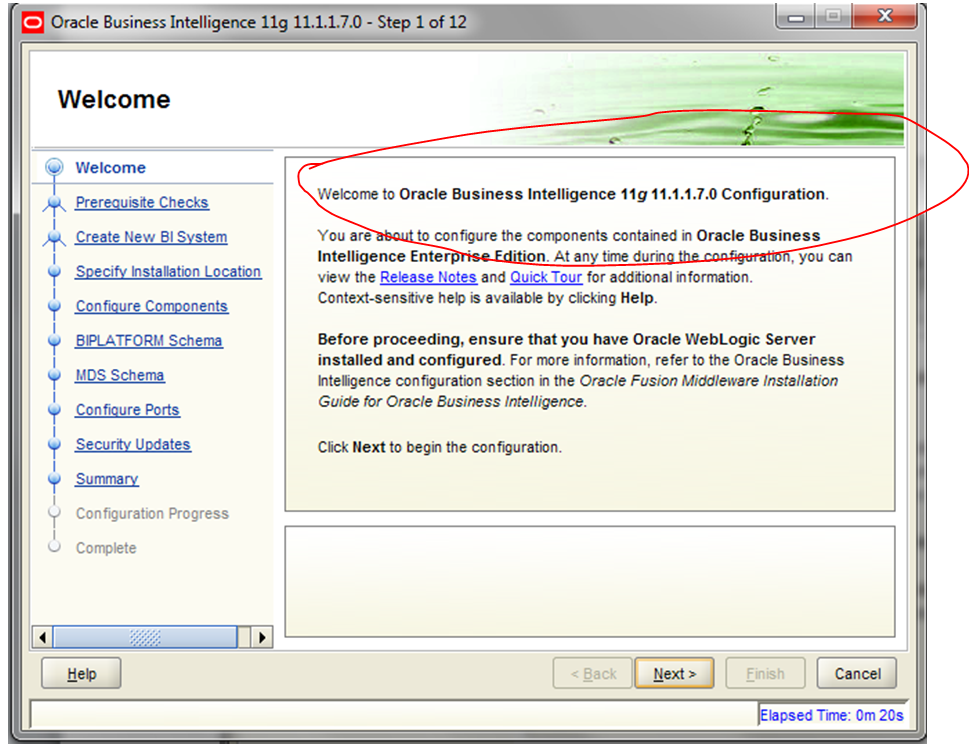
OBIEE 11.1.1.7 INSTALLATION
Download the OBIEE 11g version from here or from oracle e-delivery site and extract all the four disk into a single folder and click setup.exe from the Disk1
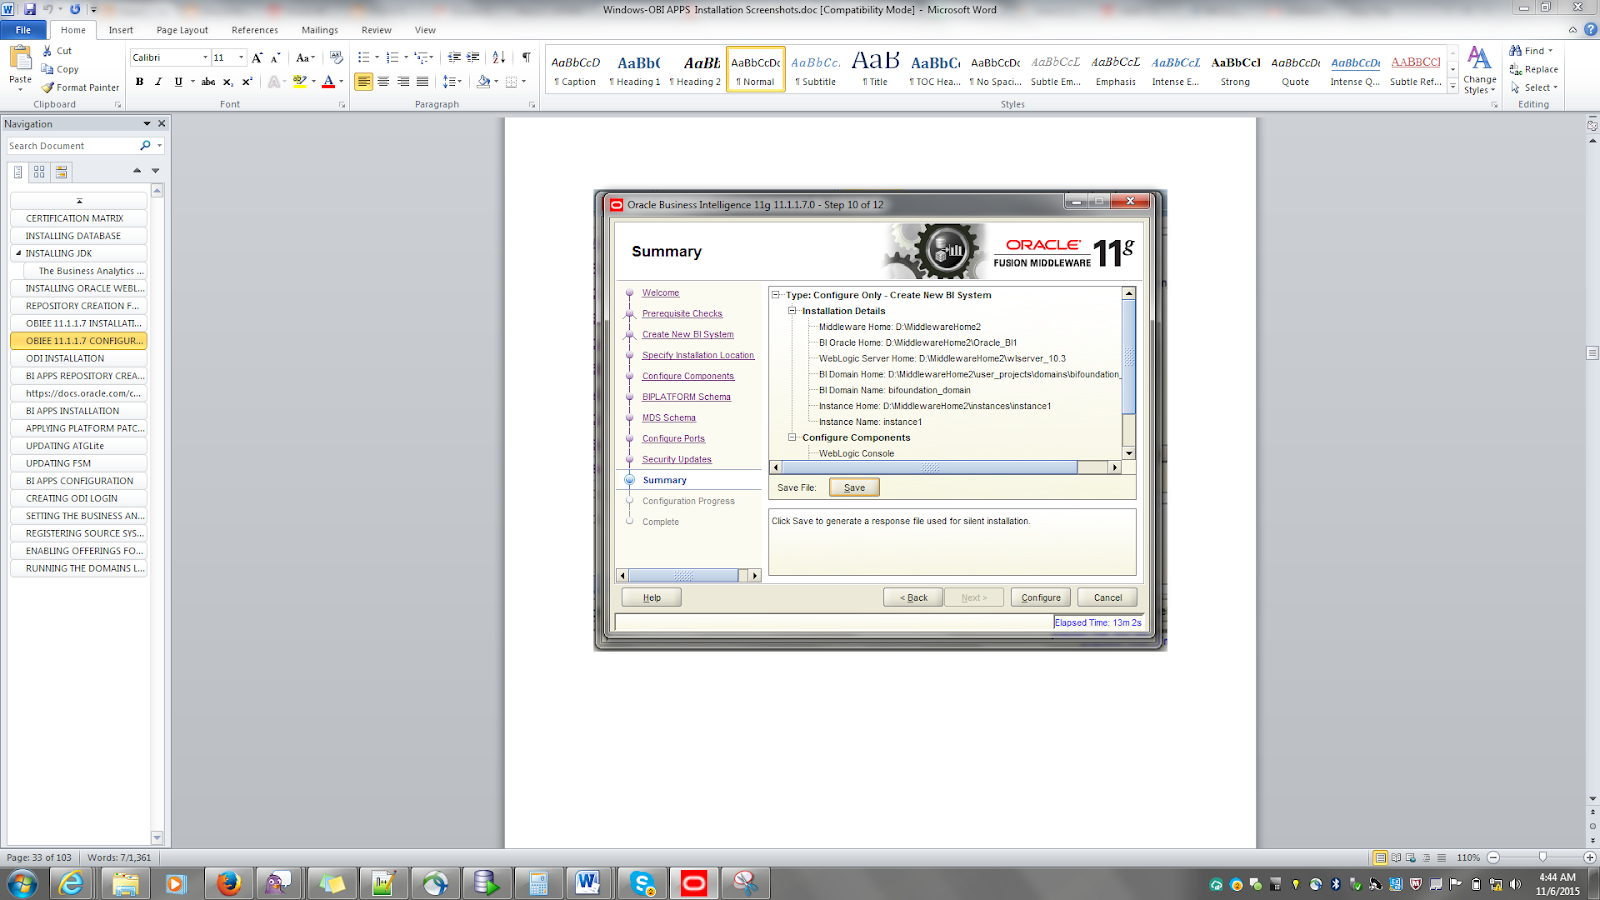
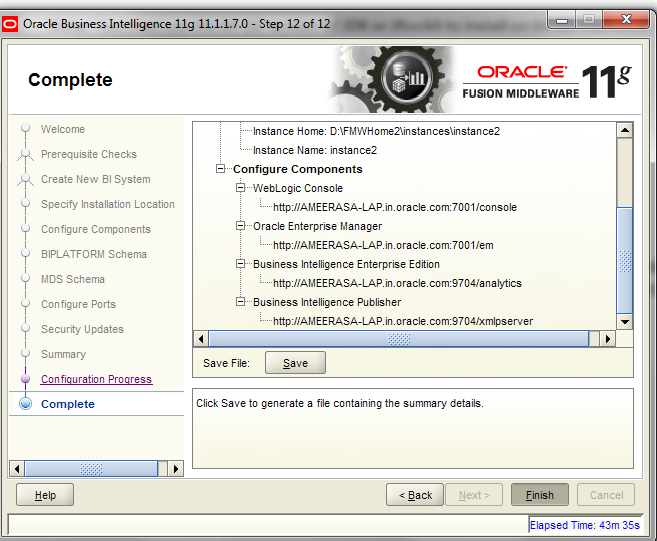
After extracting the whole files to a single folder below is the screenshot:


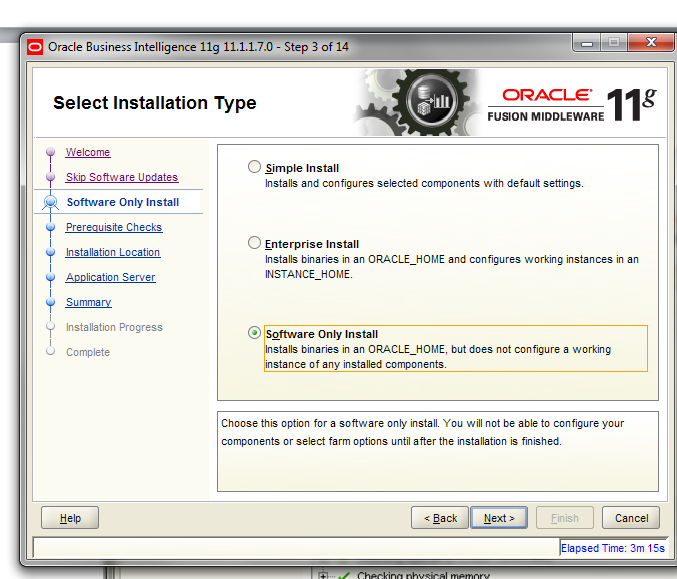


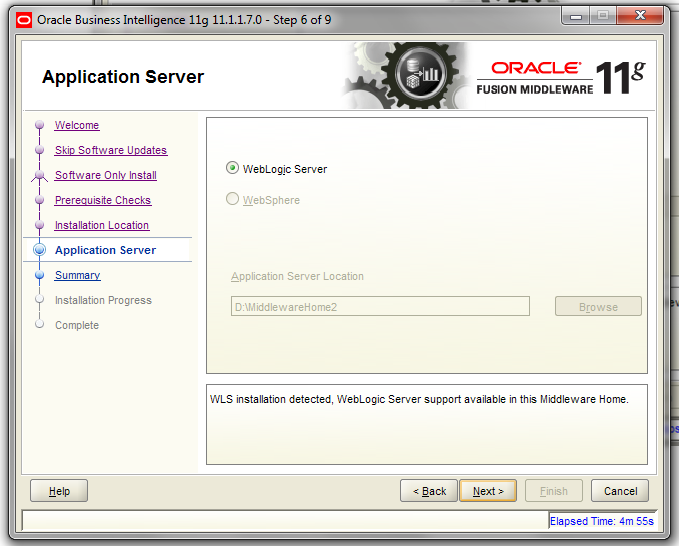


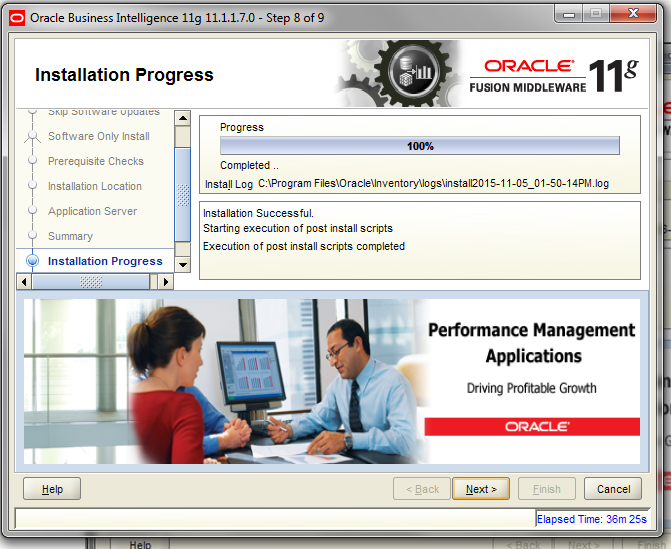
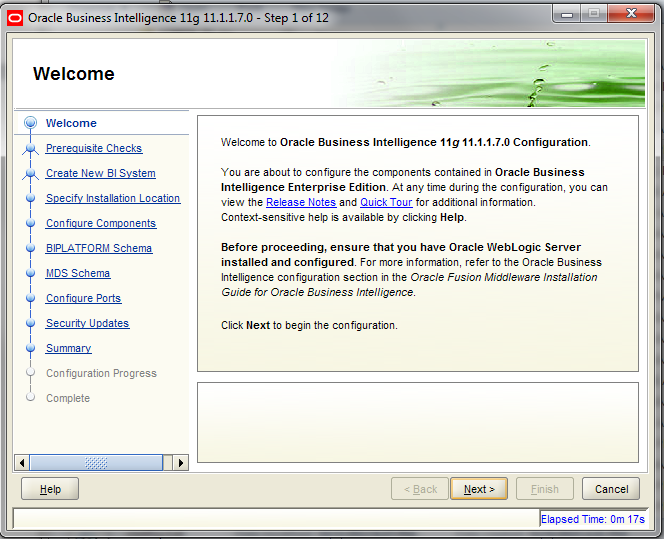
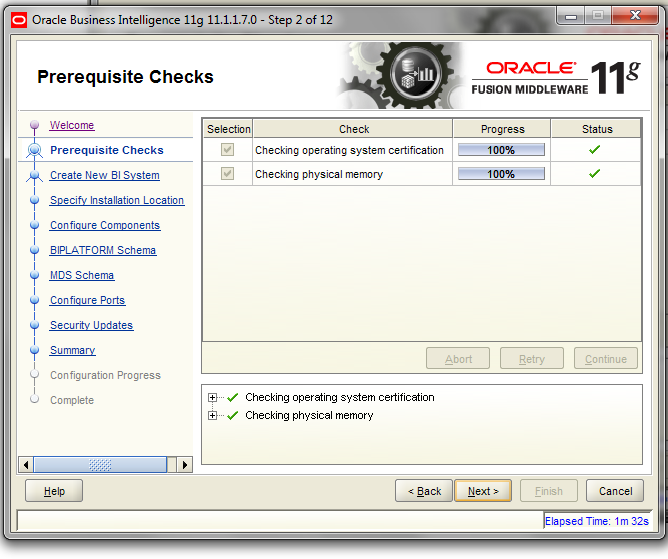
OBIEE 11.1.1.7 CONFIGURATION
The config.bat file is located in /bin. In my case the file is shown in the below path:

Right click on the bat file and selected run as Administrator:

pAssword: welcome1


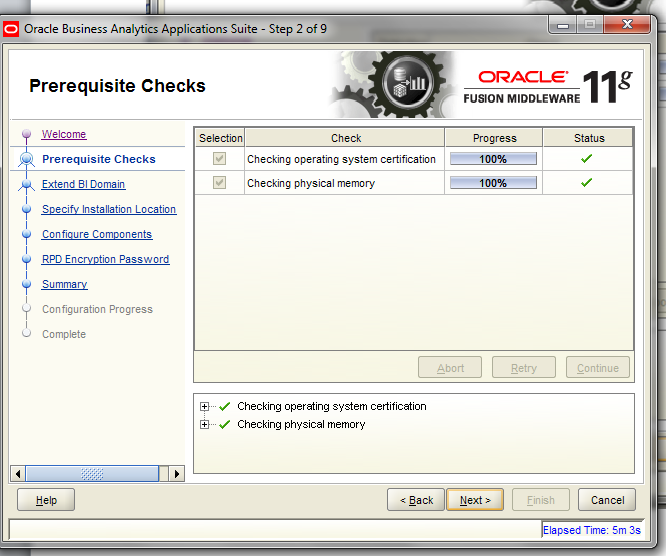
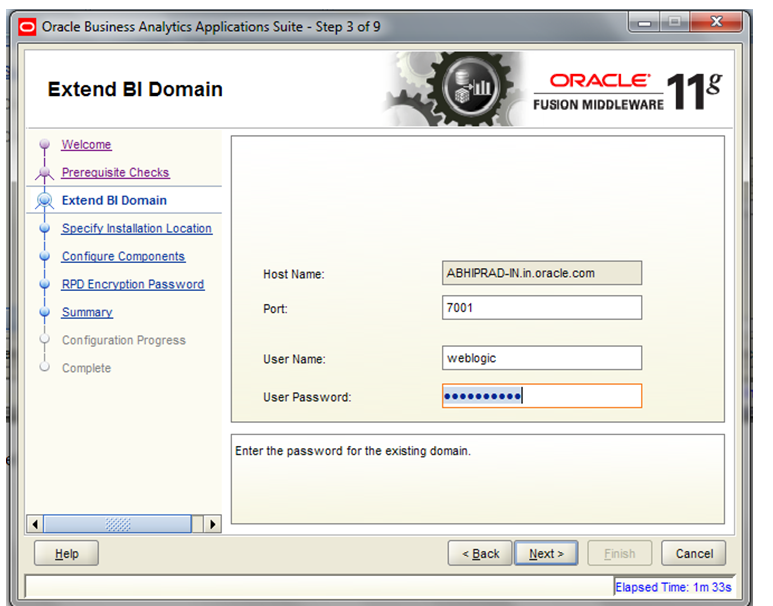
Issues faced during Configure Domain:
Issues I faced till successful BI config process:
- JDK issue :
Unrecognized VM option 'UseSpinning'
Error: Could not create the Java Virtual Machine.
Solution:
This error I faced during the BI config process. So I had to uninstall the whole installations then ,
uninstalled jdk 1.8 and reinstalled jdk 1.7
- OUI issue
OUI opens up and then pops up the issue OUI-15 something
Solution: The Classpth env variable was set to the lib directory of jdk previously itself, had to remove it
3. Then next issue came as instance cannot be created faced during BI config process itself:
Solution: removed the env variable that was previously set as oracle_HOME
4. Issue faced since I resued the same metadata schema to when I did the BI config process for the second time:
Error 'One or more entries are found in HSS_COMPONENT table'
Solution:
Login into SQLPLUS and connect BIPLATFORM Schema with the same credentials which we have given when we installed.
syntax: conn BIPLATFORM/password@connectionstring
SQL> conn DEV_BIPLATFORM/Admin123@orcl
once we connected with BIPLATFORM Schema delete the entry which is available in the HSS_COMPONENT table and commit the table.
SQL> DELETE FROM HSS_COMPONENT;
One entry deleted
SQL> COMMIT;
Commit Complete;
Now start the installation and give the BIPLATFORM AND MDS schema details in its related steps. The error will no more exist.
NB: But better to use a new metadata schema on a safer side if you face issue during Bi config process.
5 .Last type of issue that I faced during Bi config process was
java heap space issue in admin server :
Solution:
set the USER_MEM_ARGS as system environment variable. As given below:
set USER_MEM_ARGS=” -Xms256m -Xmx1024m -XX:MaxPermSize=512m”
NB:
If you face Java Heap space issue after you have done the installation then you can edit the setdomainenv.bat file and set it up.
D:\FMWHome2\user_projects\domains\bifoundation_domain\bin\ setDomainEnv.cmd
6 . Did the reinstallation after a clean uninstallation
Reference for clean uninstallation including registry clean up:
NB :
No need to apply the bundle patches of obiee because that would be automatically taken care by the technology patches
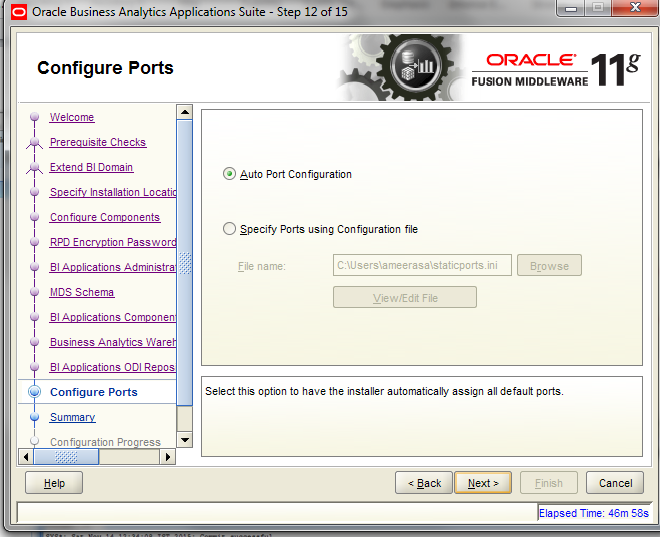
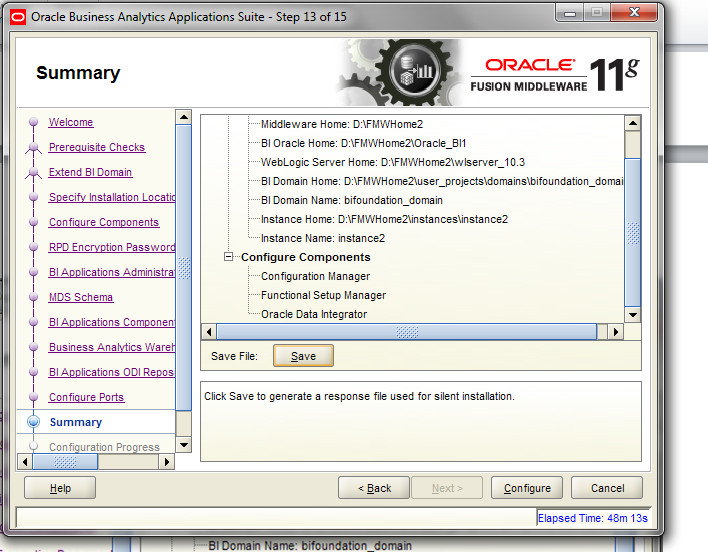
OBIA Installation
Repository creation for OBIApps
http://www.redstk.com/installing-bi-apps-11-1-1-8-1-part-1-pre-requisites/ --GOOD ONE but this is on linux. But it’s all the same .
NB: I just ran the rcu creation of obiapps even before I installed bi apps. This is fine since it is just creation of db schemas to store metadata. Usually the metadata storing of ODI will happen during the repository configuration ODI installation. Here since I have run rcu for obaips first, I will be skipping rcu creation step for odi during odi installation.
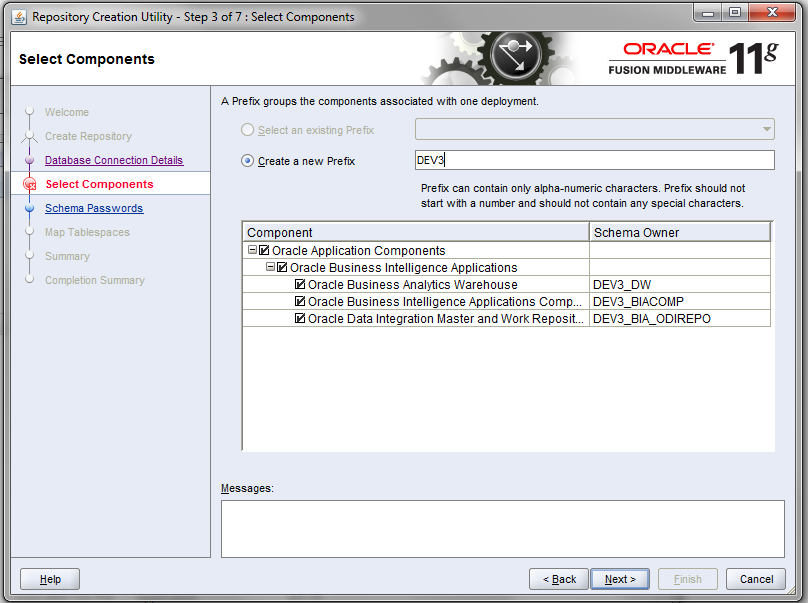
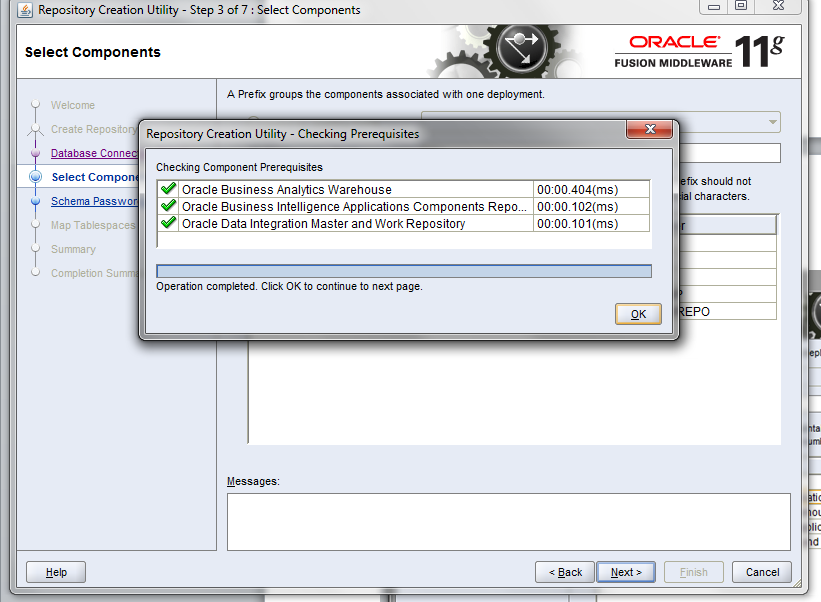
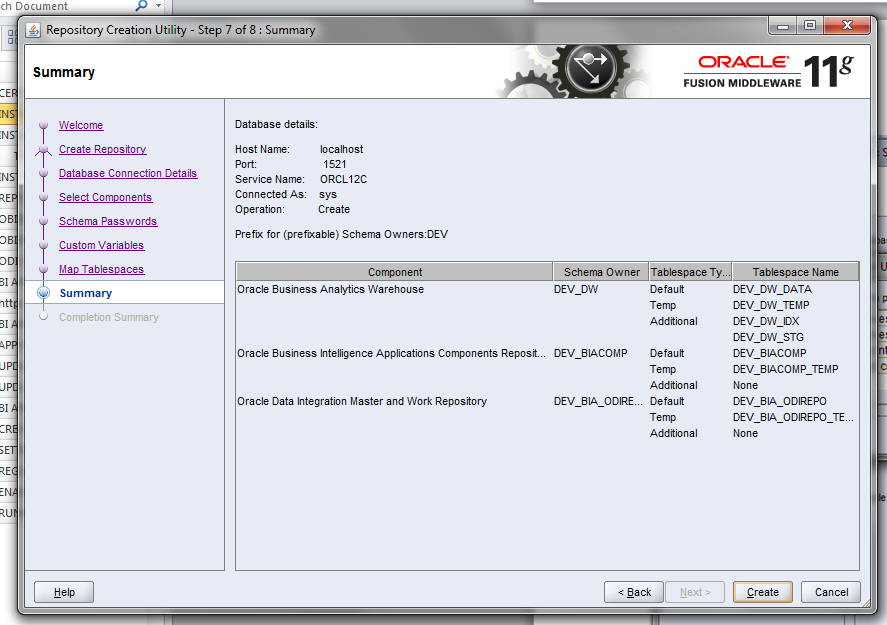
We need to run the Business Analytics Applications Suite RCU to create schemas for the following components:
- Oracle Business Analytics Warehouse
- Oracle Business Applications Components
- Oracle Data Integrator Repository for Oracle BI Applications
The RCU uses .dmp files to create the required schemas. The .dmp files for each schema must be copied to a directory with global write access on the database server machines(System on which DB is installed). RCU writes log files to this directory.
The .dmp files are located in BIA_RCU_HOME/rcu/integration/biapps/schema.
Navigate to the below folder and click on the rcu.bat file:


Password: welcome1
In the below screen; In the Value field in the Custom Variables screen, for each schema enter the directory path of the folder on the database server that contains the .dmp file(mentioned at the start of the RCU process).
So You must now enter the name of the directory where the .dmp file (obia.dmp in this case) was copied to on the database server . You do not need to specify the file name(VERY IMPORTANT ;otherwise it will fail; it has failed for me due to the same reason):


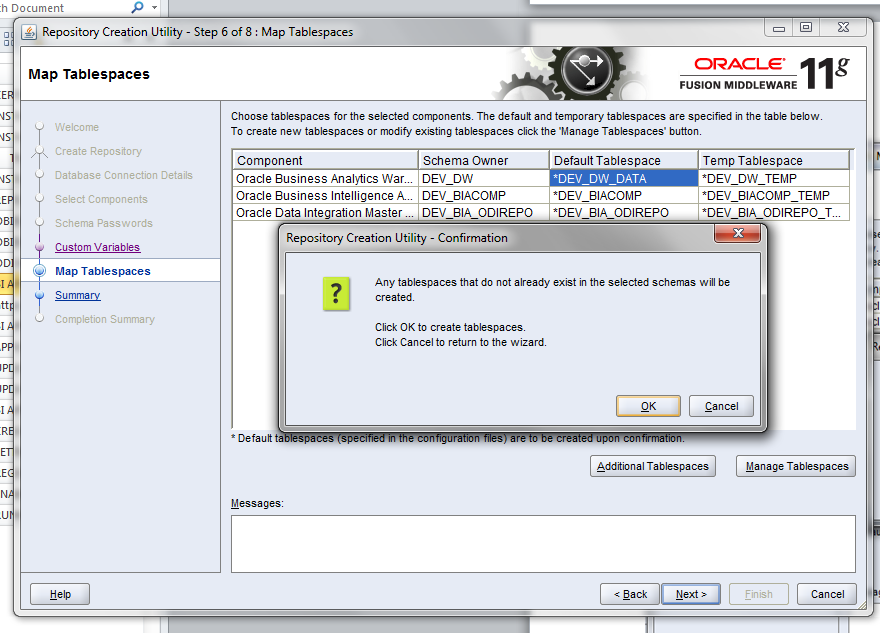
Click Manage Tablespaces.
In the left-side navigation panel, select the appropriate tablespace name.
In the main window, select the tablespace name under the Datafiles heading.
Click the Edit icon to display the Datafile dialog.
In the Edit Datafile dialog, set the temporary tablespace size according to the screenshots below.


Give 20 in the Size column


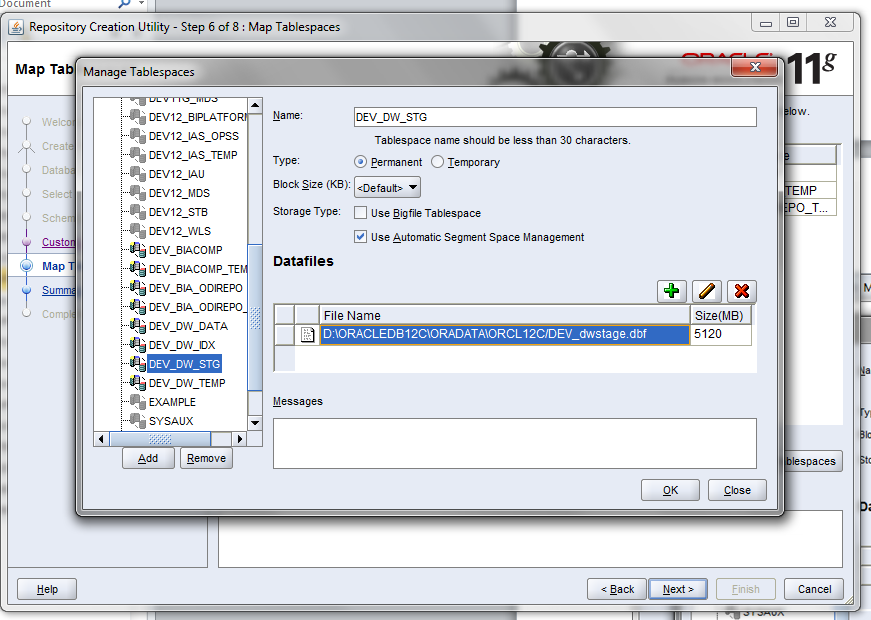

Give 10 GB in the size column
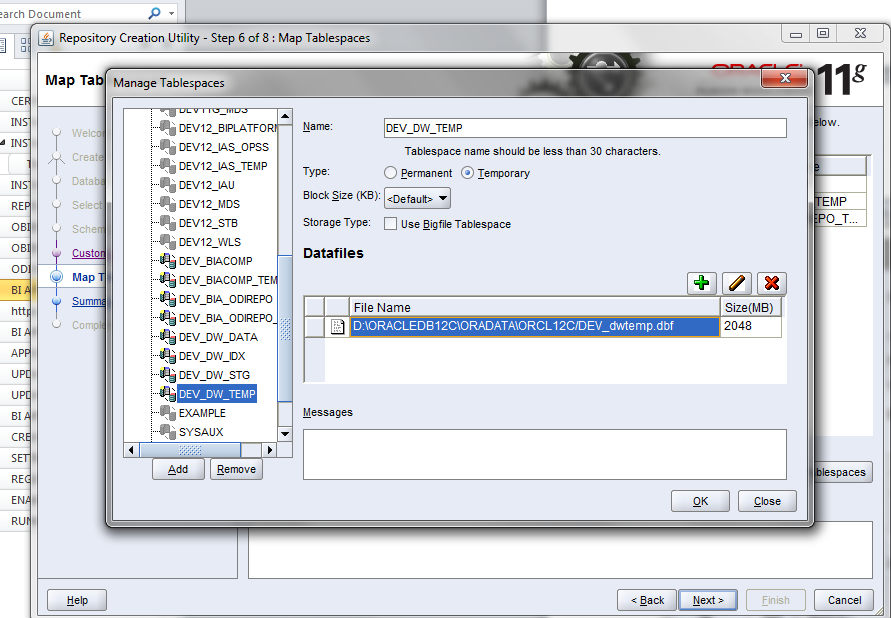

Enter 15 GB in the temp space.


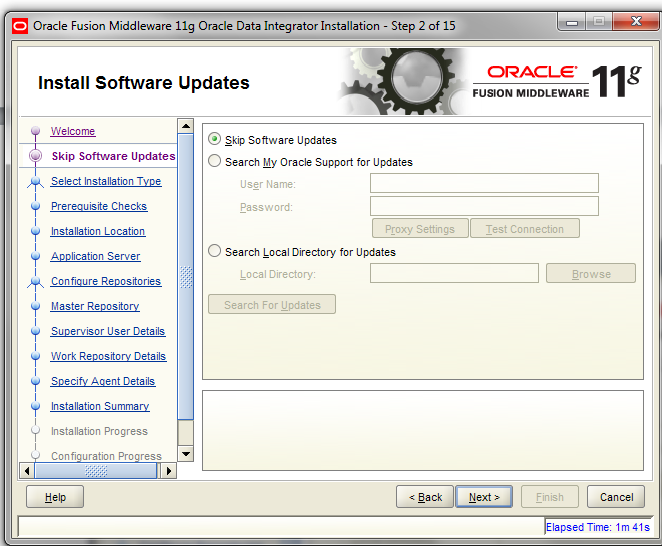
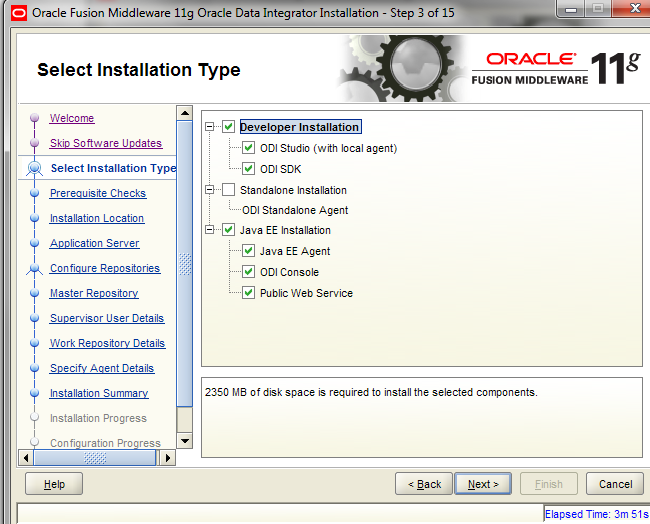
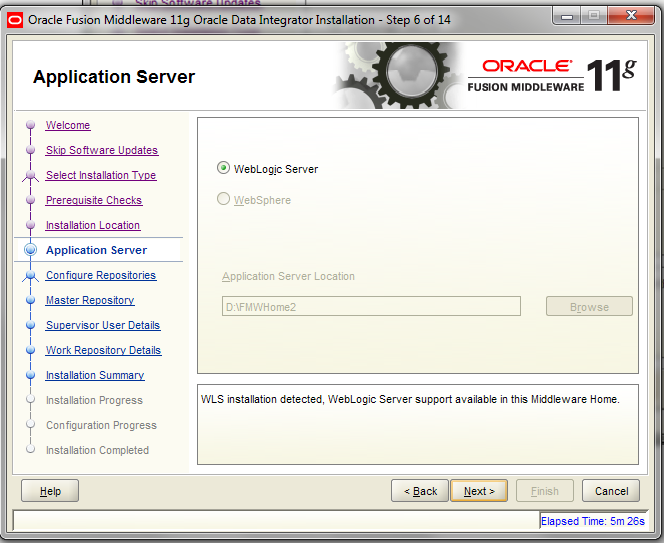
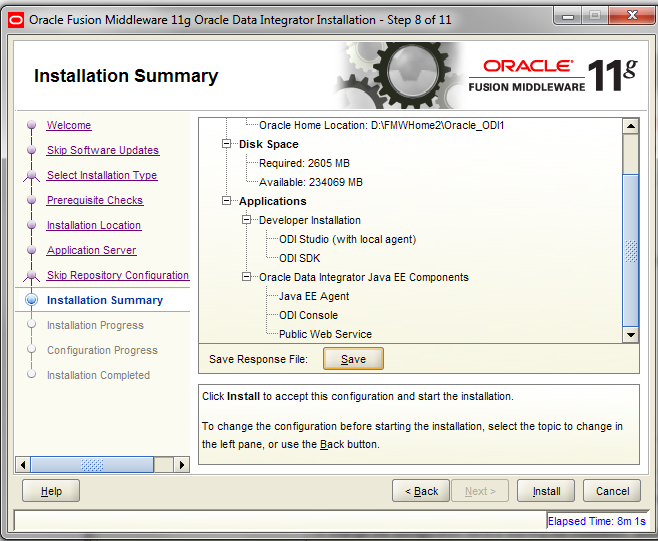
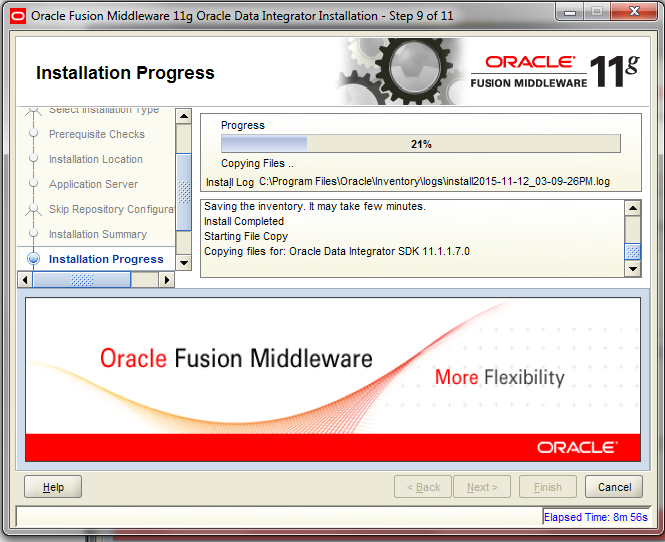
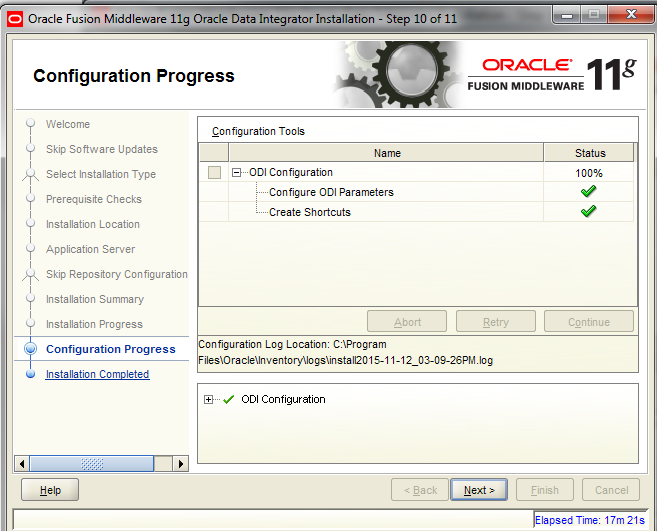
ODI Installaiton
NB :No need to apply the bundle patches for ODI 11.1.1.7.0 because that would be automatically taken care by the technology patches. The version does get patched up during the patching process later on, but not up to ODI 12c.
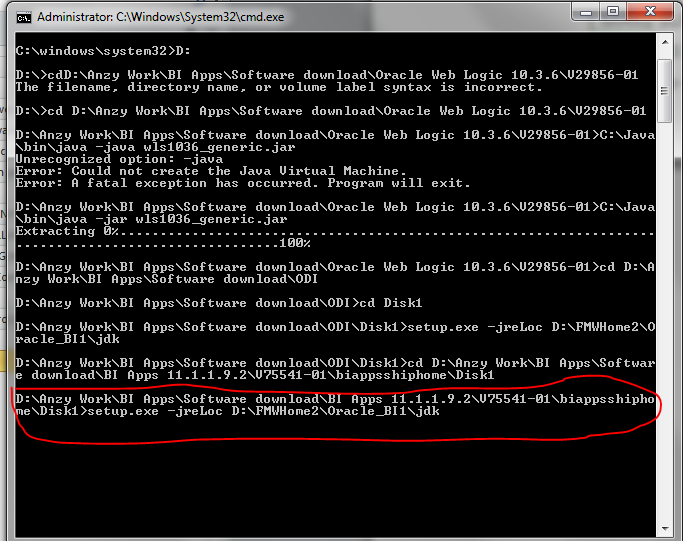
To start the installer, go to the directory where the archived file has been unpacked and switch to the Disk1 directory.
cd <unpacked_archive_directory>\Disk1
setup.exe -jreLoc <JRE_LOCATION>
The installer requires the full path to the location of a Java Runtime Environment (JRE) on the system, which must be specified using the –jreLoc parameter. While installing Oracle WebLogic Server, a JRE was installed on the system in the jdk directory inside the Middleware home. We can use this location as the JRE_LOCATION to start the installer.
Below screenshot highlights my jre path in middleware home.

Run the below command in the command prompt:
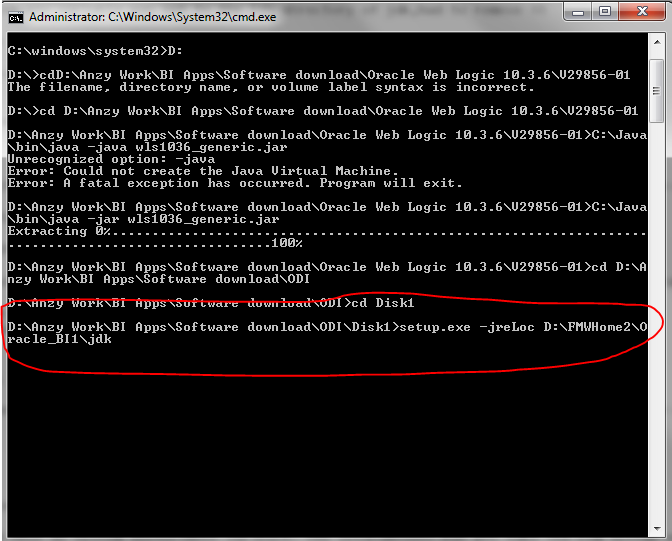
setup.exe -jreLoc D:\FMWHome2\Oracle_BI1\jdk
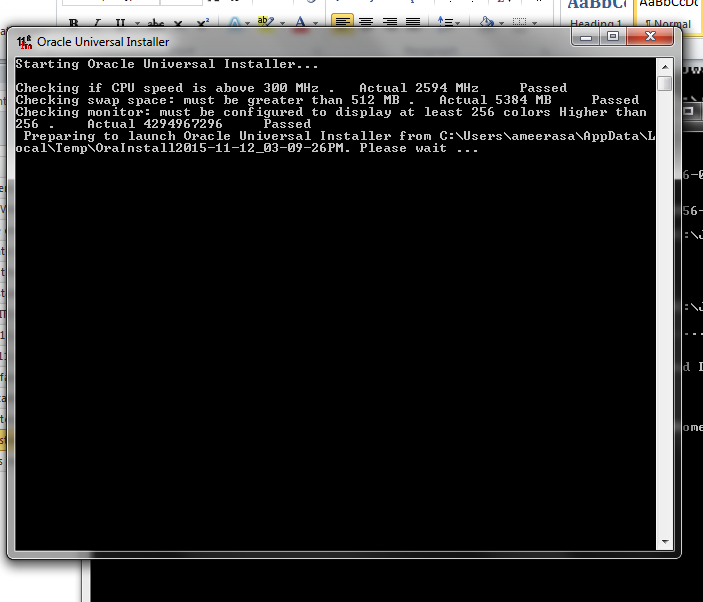
After that script the below screens will come up:


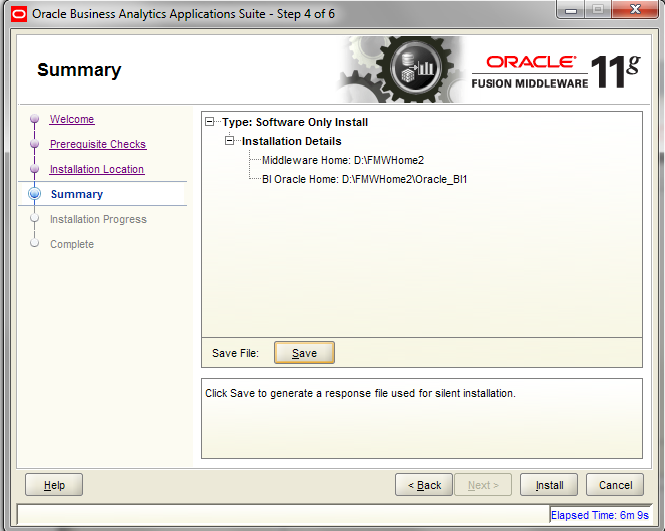
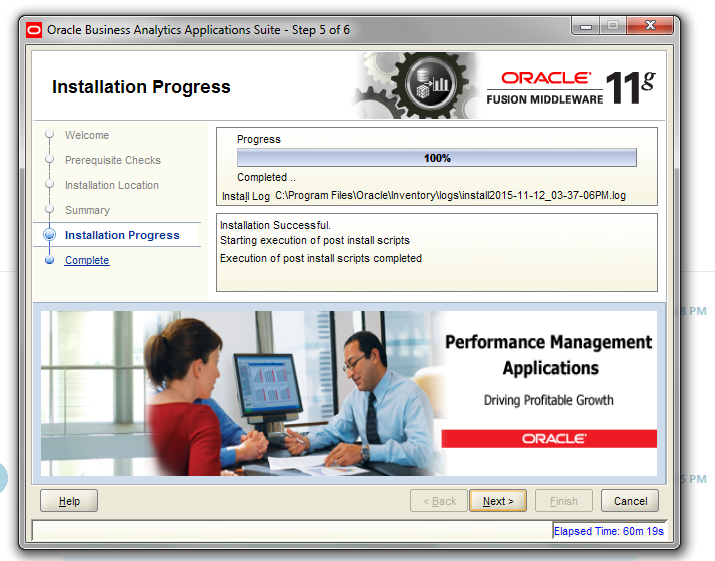
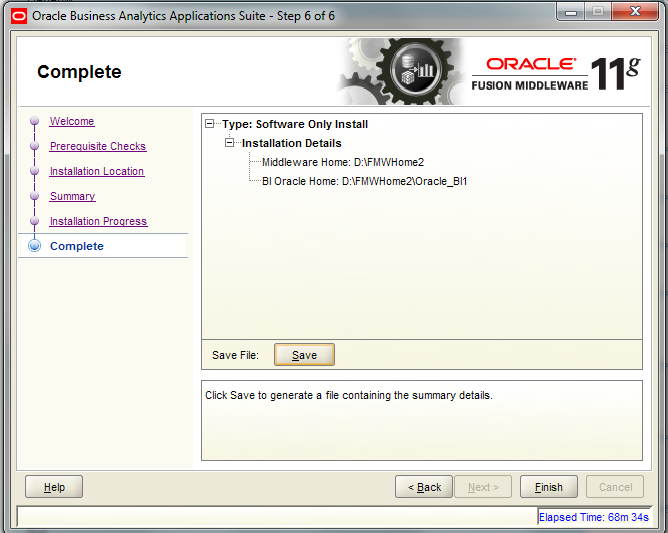
BI Apps Installation
( MAKE SURE ALL THE SERVICES ARE SHUT DOWN WHEN U APPLY PATCHES)
Run the BI Apps Installer from command prompt as we did for ODI.
setup.exe -jreLoc .
Navigate from command prompt to the installable of obia setup.exe


NB: For Oracle Home Directory, specify the oracle home for BI(in my case “Oracle_BI1”).

Platform PATCH Application
Download the platform patches ,
- Generic Part 1
- Generic Part 2
- Microsoft Windows x86-64 bit
Unzip them simultaneously into the same folder(say C:\Patches)
Run a script to apply the patches. The script is a Perl script and is available in /biapps/tools/bin/APPLY_PATCHES.pl.
The Perl script requires a parameter input file (apply_patches_import.txt) present in the same folder. In this procedure, before running the Perl script, update the parameter input file to reflect the appropriate directory paths.
Create a writable directory where logs and temporary patch files will be stored. In the apply_patches_import.txt file, set the WORKDIR=variable to point to the path for this directory(here C:\Windows\Temp\work)
Specify the following directory paths:
Directory
|
Path
|
JAVA_HOME
|
Path of the JDK you installed for your platform.
|
INVENTORY_LOC
|
Path of the Oracle\Inventory directory.
For example:
C:\Program Files\Oracle\Inventory.
|
ORACLE_HOME
|
Path of the Oracle Home for BI directory.
|
MW_HOME
|
Path of the Oracle Middleware Home directory.
|
COMMON_ORACLE_HOME
|
Path of the oracle_common directory, which is under the Middleware Home directory.
|
WL_HOME
|
Path of the Oracle WebLogic Server Home directory.
|
ODI_HOME
|
Path of the ODI Home directory.
|
WINDOWS_UNZIP_TOOL_EXE
|
If the platform is Windows, then specify an unzip tool exe with the complete path. The supported unzip tools are Winzip command line and 7-Zip command line.
For example, for the Winzip tool:
c:{PathSep}Program Files{PathSep}WinZip{PathSep}wzunzip.exe
For example, for the 7-Zip tool:
c:{PathSep}Program Files{PathSep}7-Zip{PathSep}7z.exe
|
WORKDIR
|
Path of a writable directory where logs and temporary patch files are stored.
|
PATCH_ROOT_DIR
|
Path of the patch directory.
For example:
C:\patches
or
PATCH_HOME/patches
|
Example file:
# Required JAVA_HOME - Java home
JAVA_HOME=D:\FMWHome2\Oracle_BI1\jdk
# Required INVENTORY_LOC - Inventory Location
INVENTORY_LOC=C:\Program Files\Oracle\Inventory
ORACLE_HOME=D:\FMWHome2\Oracle_BI1
MW_HOME=D:\FMWHome2
COMMON_ORACLE_HOME=D:\FMWHome2\oracle_common
WL_HOME=D:\FMWHome2\wlserver_10.3
SOA_HOME=/scratch/aime/work/mw_home/Oracle_SOA1
ODI_HOME=D:\FMWHome2\Oracle_ODI1
SKIP_BITECH_PATCHES=false
# Optionally Required WINDOWS_UNZIP_TOOL_EXE - If platform is windows, then specify unzip tool exe with complete path
# Currently only two tools : Winzip command line and 7-Zip command line are supported tools.
# Eg for Winzip tool - c:{PathSep}Program Files{PathSep}WinZip{PathSep}wzunzip.exe
# Eg for 7-Zip tool - c:{PathSep}Program Files{PathSep}7-Zip{PathSep}7z.exe
WINDOWS_UNZIP_TOOL_EXE=C:\Program Files\7-Zip\7z.exe
# Required WORKDIR - An existing writable directory to create logs and temp patch files
WORKDIR=D:\Temp\Work
# Required PATCH_ROOT_DIR - Path of patch directory till the release patch-set folder which is inside patches4fa/dist.
# i;e the patch-set folder for a particular release to apply patch from
# eg; /scratch/aime/tmp/ps1/biappsshiphome/patches4fa/dist/ps6rc3
PATCH_ROOT_DIR=D:\OBIApatches
So now all set to apply patches:
But before that stop bi services:

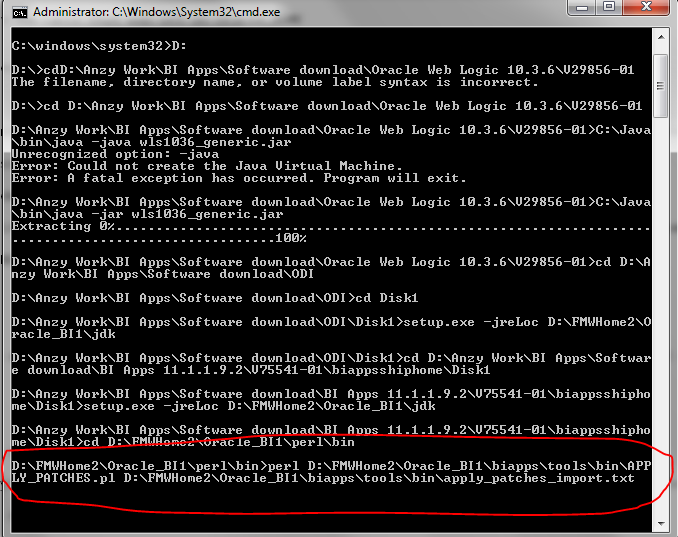
Now navigate to the below path:
D:\FMWHome2\Oracle_BI1\perl\bin where perl.exe is located

Execute the perl script by giving the input file parameter as the input:
perl D:\FMWHome2\Oracle_BI1\biapps\tools\bin\APPLY_PATCHES.pl D:\FMWHome2\Oracle_BI1\biapps\tools\bin\apply_patches_import.txt

I faced an issue at this point due to which except the odi patches the other patches got failed and for weblogic only one patch was succeeded. After checking the logs i found out some jar files were active which indicated an improper shutdown. Upon completion a patching report called final_patching_report.log will be created in the WORKDIR directory specified above.

So I did a complete stop of all the services again:
1. opmnctl stopall
2. Logged into console and shutdown biserver1(managed server)
3. Shutdown admins server from command line(stopweblogic)
After that I reapplied the aptch again with the same command a given below:
perl D:\FMWHome2\Oracle_BI1\biapps\tools\bin\APPLY_PATCHES.pl D:\FMWHome2\Oracle_BI1\biapps\tools\bin\apply_patches_import.txt
The patch got succeeded now ☺ .
Already applied patches were automatically skipped. No registry change and all happen during this patch application only file movement happens. The final patching report log was as given below:
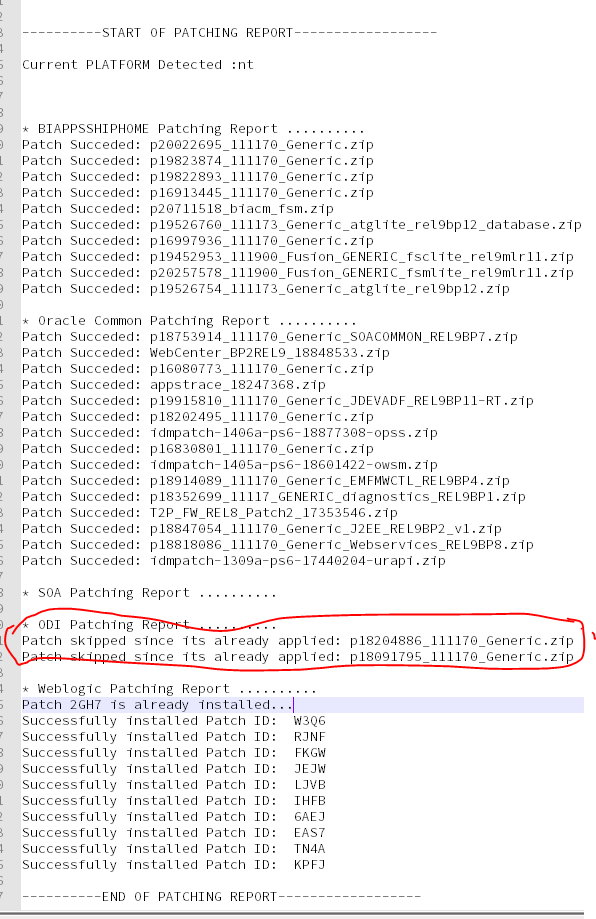
- final_patching_report.log (summary of patch application)
- biappshiphome_generic_patches.log
- biappshiphome_
_patches.log - odi_generic_patches.log
- oracle_common_generic_patches.log
- weblogic_patching.log
I didn’t find the windows specific patch logs in the work directory. So I checked with the Opatch command.
Navigate to the below path:
D:\FMWHome2\Oracle_BI1\OPatch
And type the below command opatch version
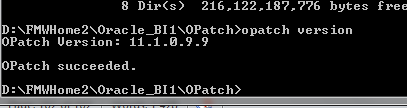
Then type opatch lsinventory just to verify whether that patch is applied or not.
All looks good now.
- Start WLS Administration Server, Node Manager, and BI Managed Server.
You must start the BI Managed Server using WLS Admin Console. Start the BI processes using OPMN.

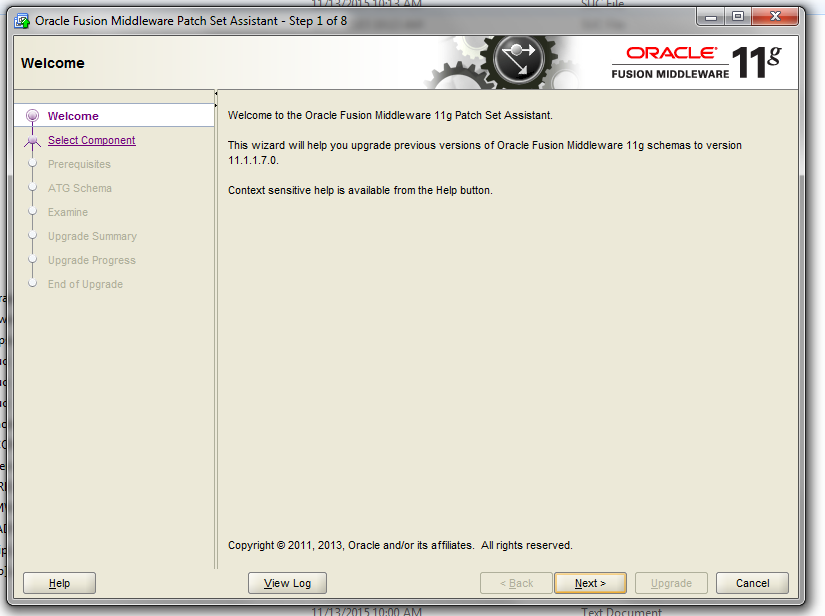
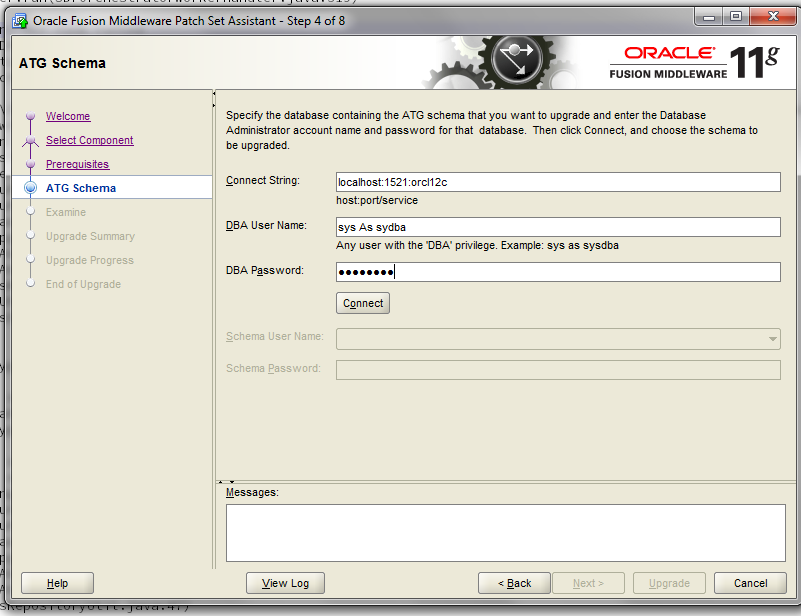
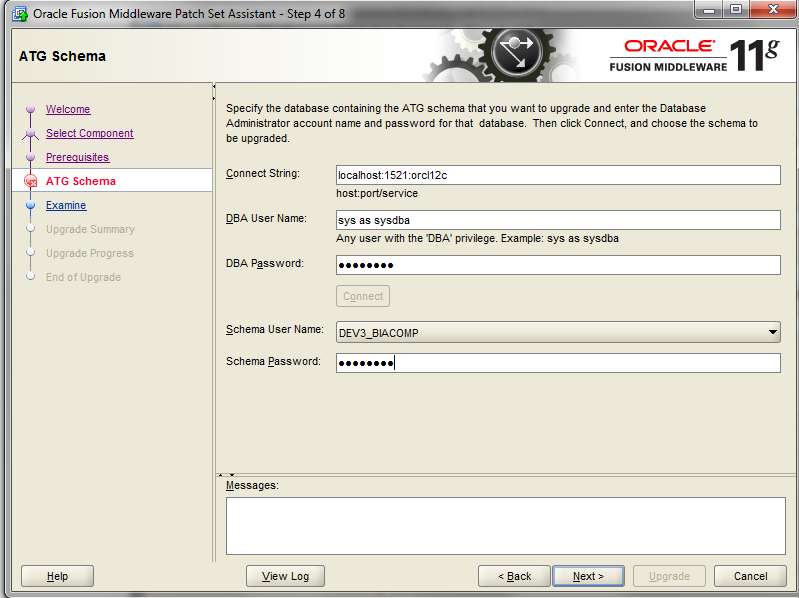
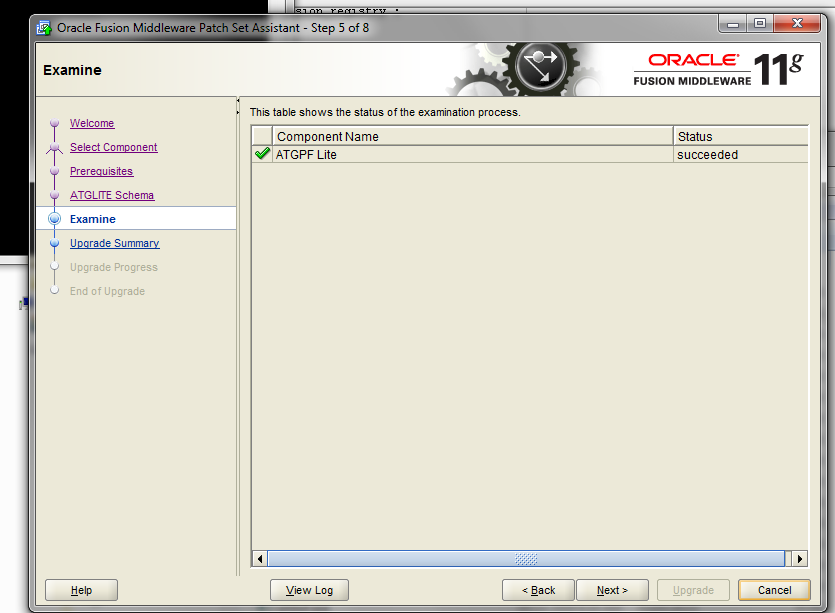
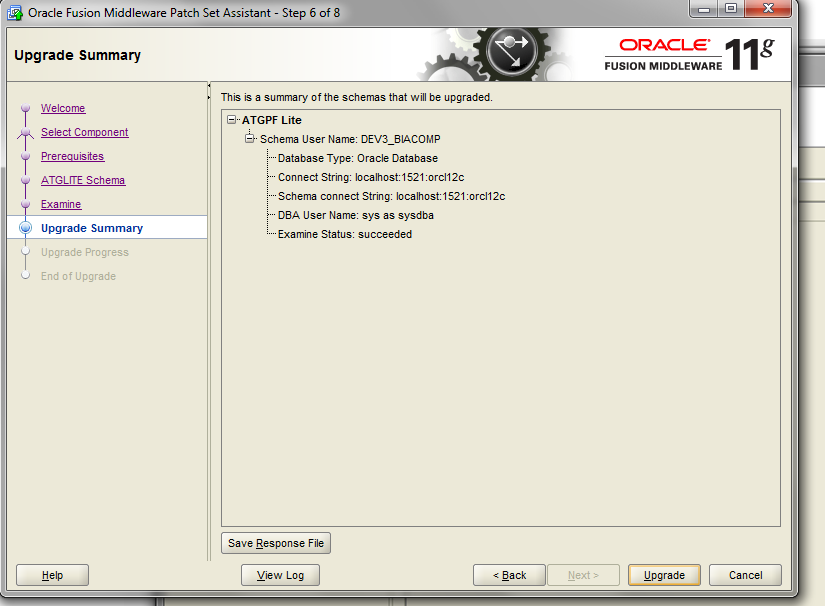
UPDATING ATGLite(Must not skip this step)
Use these instructions to update the ATGLite data in the BIACOMP schema.
Upgrade ATGLite schemas from 11.1.1.7.0 to 11.1.1.7.3 before configuring BI Applications.
Navigate to the below path:


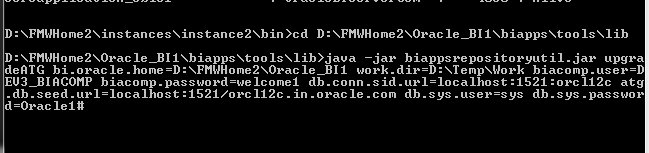
java -jar biappsrepositoryutil.jar upgradeATG bi.oracle.home=D:\FMWHome2\Oracle_BI1 work.dir=D:\Temp\Work biacomp.user=DEV3_BIACOMP biacomp.password=welcome1 db.conn.sid.url=localhost:1521:orcl12c atg.db.seed.url=localhost:1521/orcl12c.in.oracle.com db.sys.user=sys db.sys.password=Oracle1#
OR
In 11.1.1.9 series GUI is available to perform the upgrade.


I faced an issue at this point:
- Could not connect to data base as sysdba
It was an Adhoc issue. But in order to resolve it out as per an oracle document I performed the below steps.
1. Download the ATGLitePlugin.jar and atg.xml from bugftp
2. Change dir to Oracle_home
cd /jlib
3. Backup existing jar
mv ATGLitePlugin.jar ATGLitePlugin.jar.pre21544537
4. Copy over downloaded jar ATGLitePlugin.jar
5. Change dir to Oracle_home as below
cd /upgrade/components
6. Backup existing config file
mv atg.xml atg.xml.pre21544537
7. Update Schema Version Registry to reflect component
Login to db using sysdba credentials and run following SQL:
update
set COMP_ID = 'ATGLITE', MR_NAME='ATGLITE', MR_TYPE='ATGLITE'
where COMP_ schema_version_registry ID ='ATG' and OWNER=''
8. Re-run psa
But again I faced the same issue saying the status string in INVALID. So I manually updated the status stirng of ATGLITE schema to VALID in schema_version_registry and then the examine was successful and it allowed me to proceed. Actually what has happened was; initially when the psa has performed the check it could not connect to the database and set the status string as INVALID ,which was being reflected again and again in the next exam check. After changing it manually everything went fine.
Log entry:
Database driver name: Oracle JDBC driver
[2015-11-13T12:54:10.600+05:30] [Framework] [NOTIFICATION] [upgrade.Framework] Database driver version: 11.2.0.3.0
[2015-11-13T12:54:10.607+05:30] [ATGLITE] [NOTIFICATION] [upgrade.ATGLITE.ATGLITE] ######### Source Release: 11.1.1.7.0
[2015-11-13T12:54:10.608+05:30] [ATGLITE] [NOTIFICATION] [upgrade.ATGLITE.ATGLITE] ######### Target Release: 11.1.1.7.3
[2015-11-13T12:54:10.608+05:30] [ATGLITE] [NOTIFICATION] [upgrade.ATGLITE.ATGLITE] ######### statusstring: INVALID
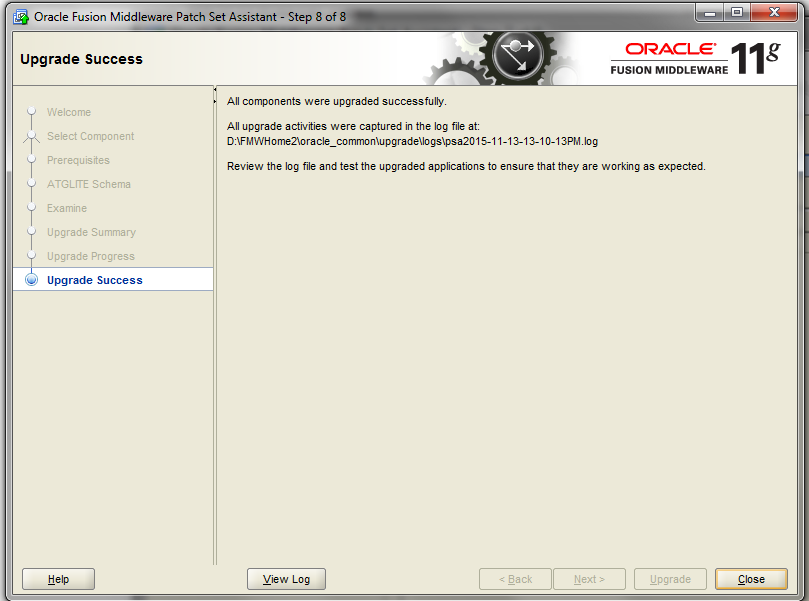
The log is available in the below path:
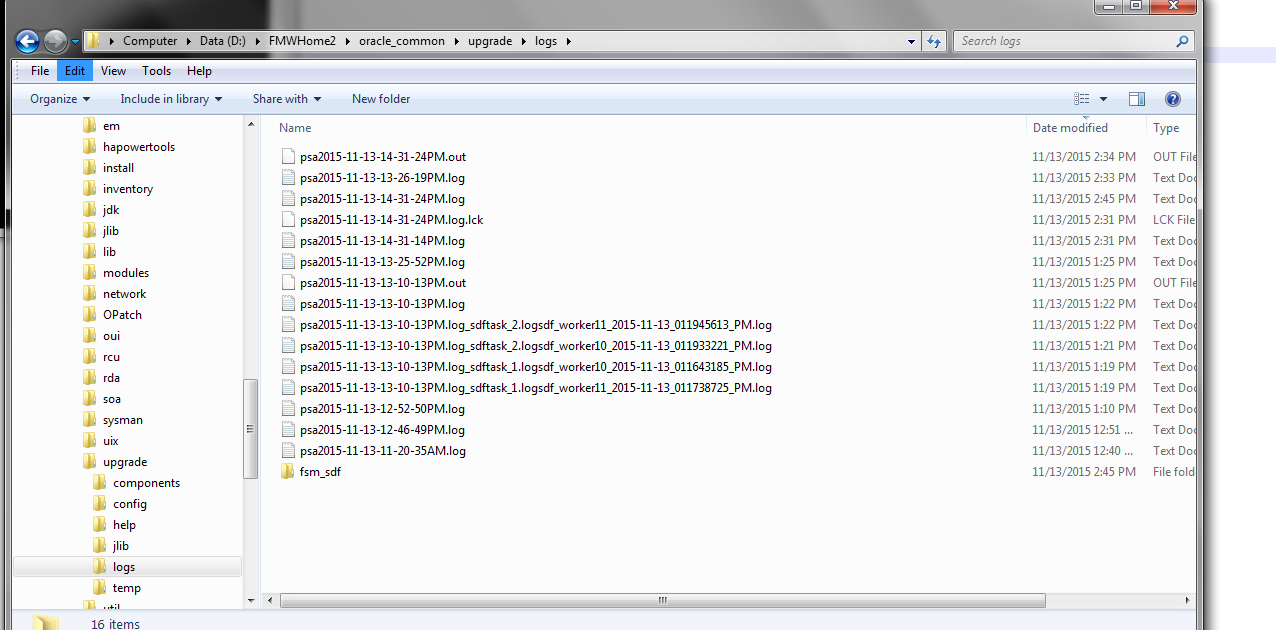
Path of the patch assistant logs: D:\FMWHome2\oracle_common\upgrade\logs


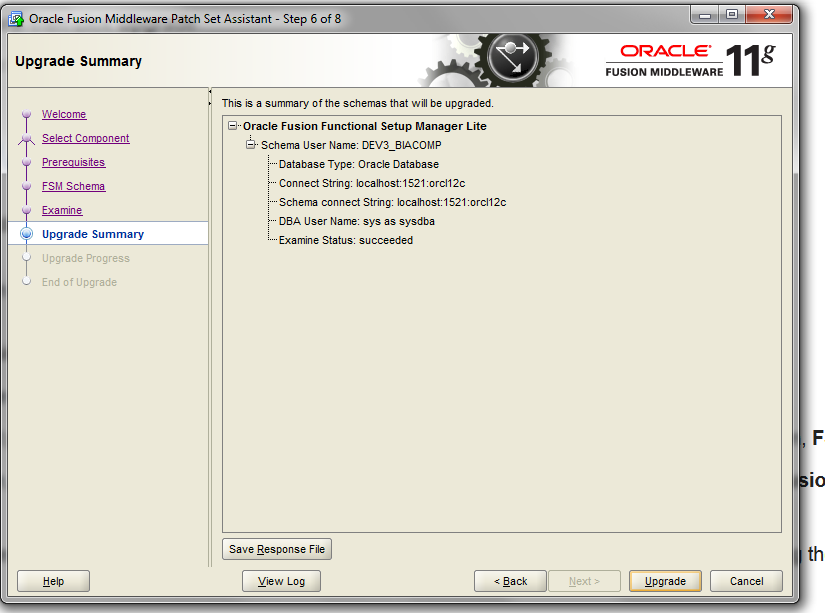
UPDATING FSM (Must not skip this step)


The log showed as below:
iddleware upgrade
[2015-11-13T13:28:05.728+05:30] [Framework] [NOTIFICATION] [] [upgrade.Framework] [tid: 15] [ecid: 0000L3zqGyA8hoH_Mth8ie1MHPUZ000003,0] Db connect string for FSM jdbc:oracle:thin:sys as sysdba/******@localhost:1521:orcl12c
[2015-11-13T13:28:12.768+05:30] [Framework] [NOTIFICATION] [] [upgrade.Framework] [tid: 15] [ecid: 0000L3zqGyA8hoH_Mth8ie1MHPUZ000003,0] Db connect string for FSM jdbc:oracle:thin:DEV3_BIACOMP/******@localhost:1521:orcl12c
[2015-11-13T13:28:12.854+05:30] [Framework] [NOTIFICATION] [] [upgrade.Framework] [tid: 30] [ecid: 0000L3zqX5q8hoH_Mth8ie1MHPUZ000004,0] Starting to examine components.
[2015-11-13T13:28:12.860+05:30] [Framework] [NOTIFICATION] [] [upgrade.Framework] [tid: 30] [ecid: 0000L3zqX5q8hoH_Mth8ie1MHPUZ000004,0] Libraries for FSM.FSM
[2015-11-13T13:28:12.860+05:30] [Framework] [NOTIFICATION] [] [upgrade.Framework] [tid: 30] [ecid: 0000L3zqX5q8hoH_Mth8ie1MHPUZ000004,0] D:/FMWHome2/Oracle_BI1/jlib/FunctionalSetupManagerLitePlugin.jar
[2015-11-13T13:28:12.897+05:30] [Framework] [INCIDENT_ERROR] [UPGAST-00056] [upgrade.Framework] [tid: 30] [ecid: 0000L3zqX5q8hoH_Mth8ie1MHPUZ000004,0] error initializing upgrade plug-in for FSM.FSM
[2015-11-13T13:28:12.897+05:30] [Framework] [INCIDENT_ERROR] [] [upgrade.Framework] [tid: 30] [ecid: 0000L3zqX5q8hoH_Mth8ie1MHPUZ000004,0] Cause: An unexecpted error occurred initializing an upgrade plug-in.
[2015-11-13T13:28:12.897+05:30] [Framework] [INCIDENT_ERROR] [] [upgrade.Framework] [tid: 30] [ecid: 0000L3zqX5q8hoH_Mth8ie1MHPUZ000004,0] Action: Contact Oracle Support Services. See the secondary error message for additional details.
[2015-11-13T13:28:12.897+05:30] [Framework] [INCIDENT_ERROR] [] [upgrade.Framework] [tid: 30] [ecid: 0000L3zqX5q8hoH_Mth8ie1MHPUZ000004,0] [[
java.lang.reflect.InvocationTargetException
at sun.reflect.NativeConstructorAccessorImpl.newInstance0(Native Method)
at sun.reflect.NativeConstructorAccessorImpl.newInstance(NativeConstructorAccessorImpl.java:57)
at sun.reflect.DelegatingConstructorAccessorImpl.newInstance(DelegatingConstructorAccessorImpl.java:45)
at java.lang.reflect.Constructor.newInstance(Constructor.java:526)
at oracle.ias.update.plugin.Plugin.instantiatePlugin(Plugin.java:241)
at oracle.ias.update.plugin.Plugin.(Plugin.java:222)
Reference Doc:
Solution1:
OBIA 11.1.1.9 "Error initializing upgrade plug-in for FSM" while Upgrading FSM Component (Doc ID 2015232.1)
OR
Solution2:
If you want to do the FSM upgrade with Patch Set Assistance , then run the PSA with the jdk installed as part of OBI Installation in OBI_HOME/jdk , it will work fine. Change the $JAVA_HOME variable in WLS_HOME/oracle_common/bin/commEnv.sh set this to OBIEE jdk .
Navigate to the below path :

Set this variable to the Oracle_home jdk:
 |
And now re run the Patch Assistant. It went successfully.


BI APPS CONFIGURATION
You'll need to run the configApps.bat or configApps.sh file to extend the BI Domain to deploy Oracle BI Applications and to configure the components.
During this phase, these key configurations occur:
- Oracle BI Applications Configuration Manager, Functional Setup Manager, ODI Java EE Agent, ODI Console, and Load Plan Generator are deployed into WebLogic Server.
- Component wiring is performed.
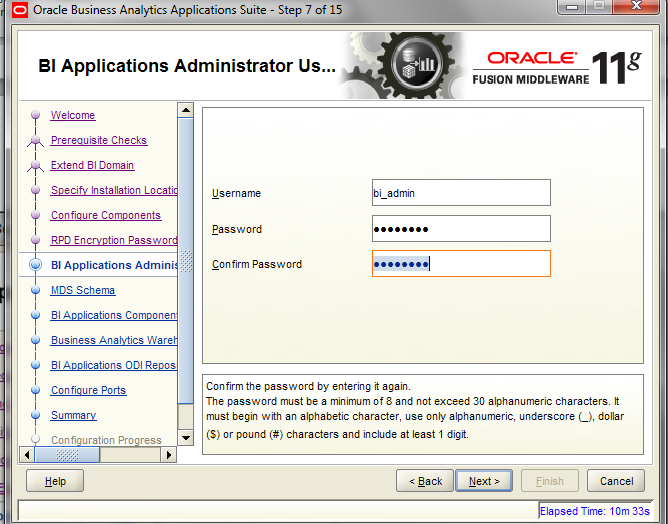
- A BI Applications Administrator User (with full access to Configuration Manager and access to ODI with the Supervisor role) is created in WebLogic Server embedded LDAP.
- The Oracle Data Integrator Repository for Oracle BI Applications is configured and set to use external authentication (that is, authentication against the WebLogic Server embedded LDAP).
The configApps.bat and configApps.sh files are located in ORACLE_HOME/bin.
- Before running the configApps process, ensure that WLS Admin Server, Node Manager, and BI Services are running.
- Start the configuration utility from the bin directory in the Oracle home (default folder name is Oracle_BI1), based on the operating system:
UNIX commands:
cd ORACLE_HOME/bin
./configApps.sh
Windows commands:
cd ORACLE_HOME\bin
configApps.bat
Issue faced: (Solution given after this step)
Navigate to the below path:
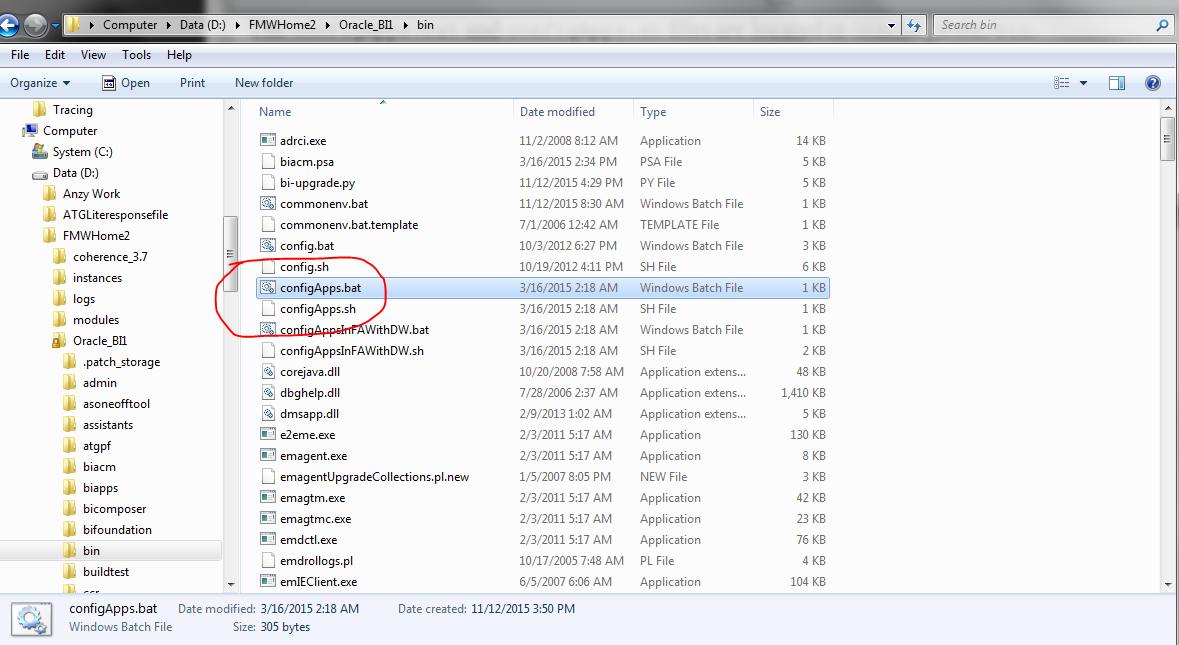
D:\FMWHome2\Oracle_BI1\bin


NB: I faced an issue here ; the configbiApps.bat has to be invoked from command prompt otherwise it would invoke config.bat by default that is the configuration for OBIEE 11.1.1.7.0. as per the above screenshot and it would give an error as “only empty domain can be extended”
Solution:
So I invoked the .bat file from command prompt and then got the below screen which is the expected one:

welcome1


Admin123
welcome1
welcome1

welcome1
Got an issue here. This issue happened since I have done an update step during the ATG upgrade step. If you have not done it you will not face this issue.

Solution:
update schema_version_registry
set COMP_ID = 'ATG', MR_NAME='ATG', MR_TYPE='ATG'
where COMP_ID ='ATGLITE' and OWNER='DEV3_BIACOMP'
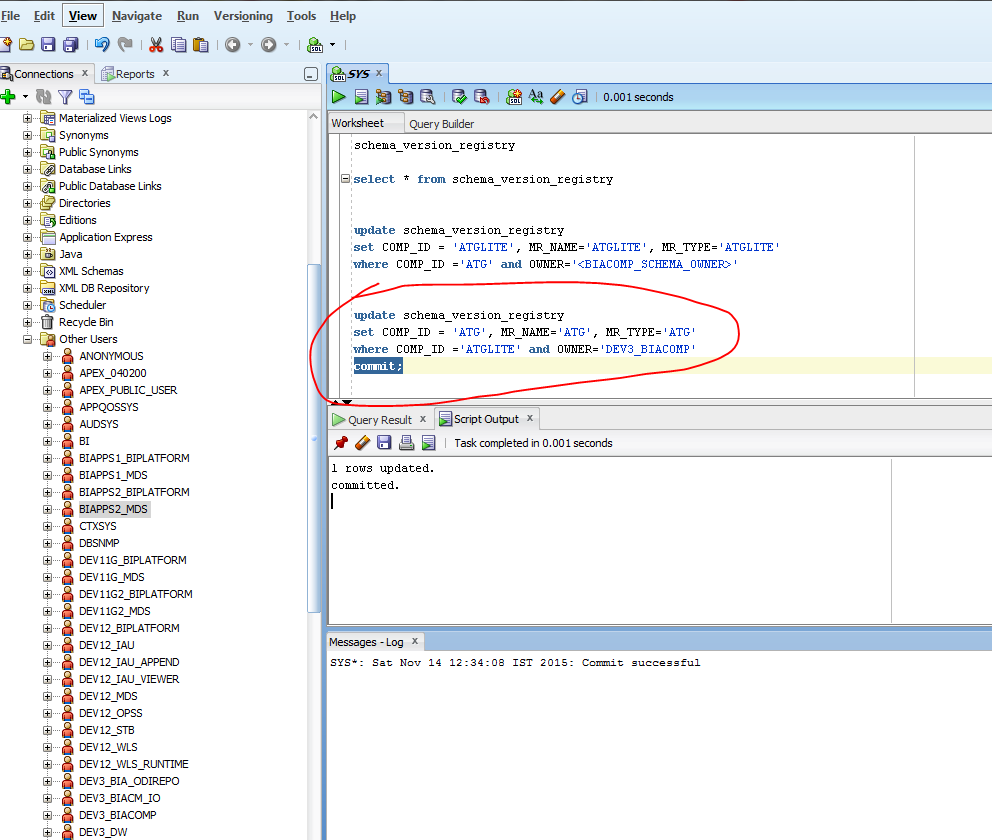
After committing the above script; it passed to the next screen:

welcome1

welcome1
The configuration will take some time wait patiently☺.


CREATING ODI LOGIN
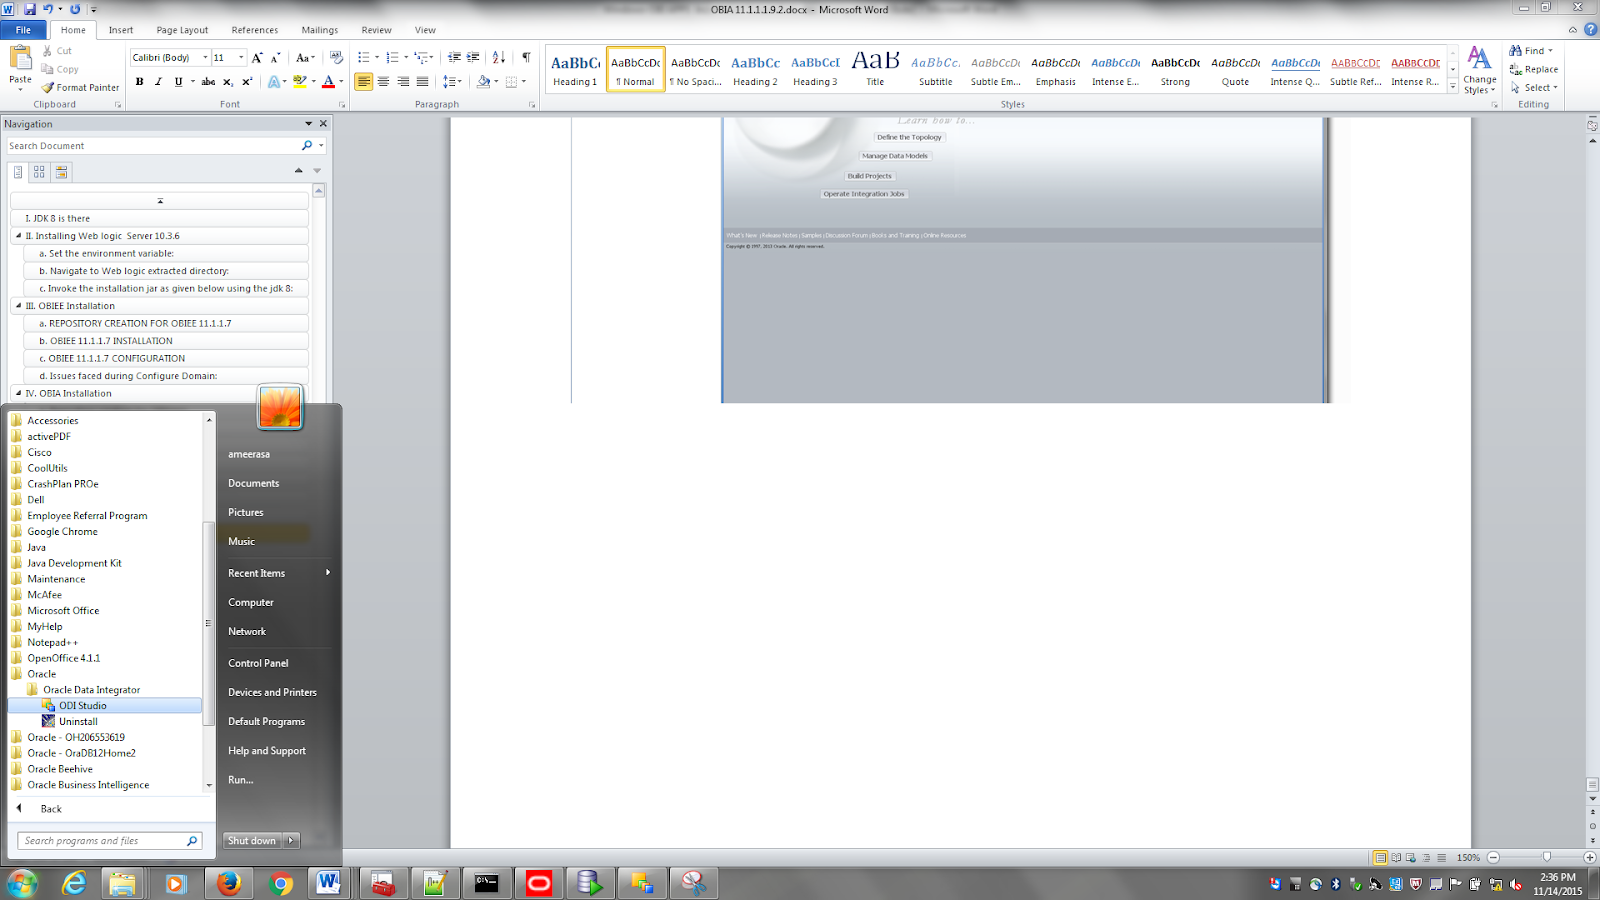
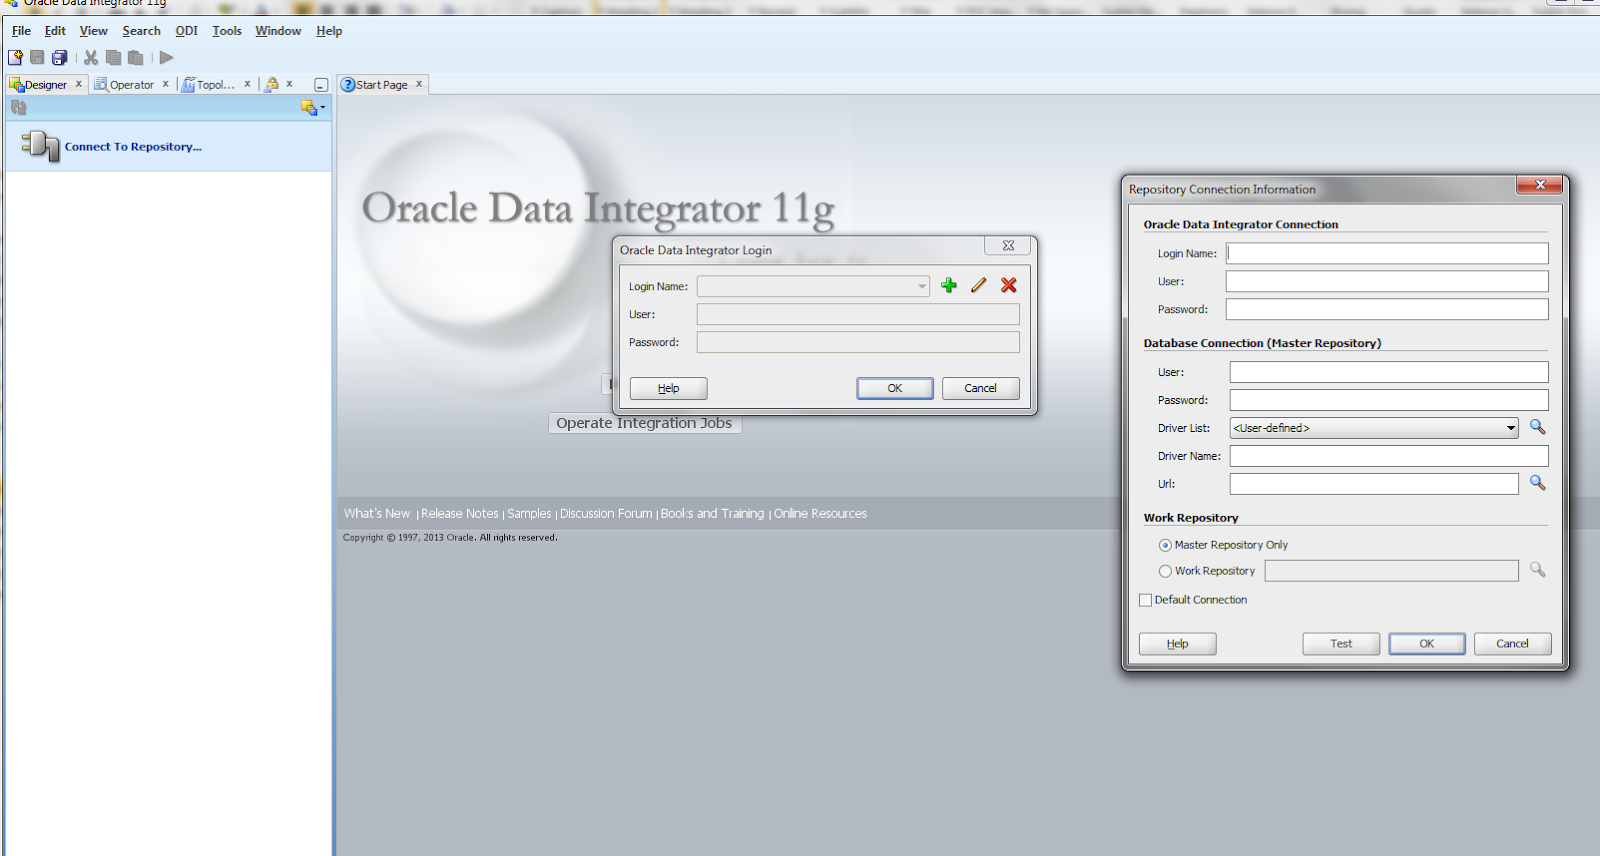
Open the ODI studio client as shown in the below screenshot:
The client is otherwise located in the below path as well : D:\FMWHome2\Oracle_ODI1\oracledi\client

NB: It was not required for me to install ODI studio client in my machine since it was the server itself. If you are trying to access the server from a client machine then you have to install ODI studio separately.
- Installing ODI Studio
You install ODI Studio using the Oracle Data Integrator installer.
Note these points:
- On the Select Installation Type screen, select Developer Installation as the installation type and both options under Developer Installation, that is, ODI Studio (with local agent) and ODI SDK.
- On the Repository Configuration screen, select the Skip Repository Configuration option.
For instructions on installing ODI Studio, see Oracle Fusion Middleware Installation Guide for Oracle Data Integrator.
- Configuring User Access for ODI Studio
The Oracle Data Integrator Repository is configured for external authentication against the WebLogic Server embedded LDAP server. ODI Studio must be configured to use the appropriate security files for authentication. You must perform these steps on all installations of ODI Studio.
Note:
You must perform these steps even if ODI Studio has been installed on the machine where Oracle Home for BI resides.
To configure user access for ODI Studio:
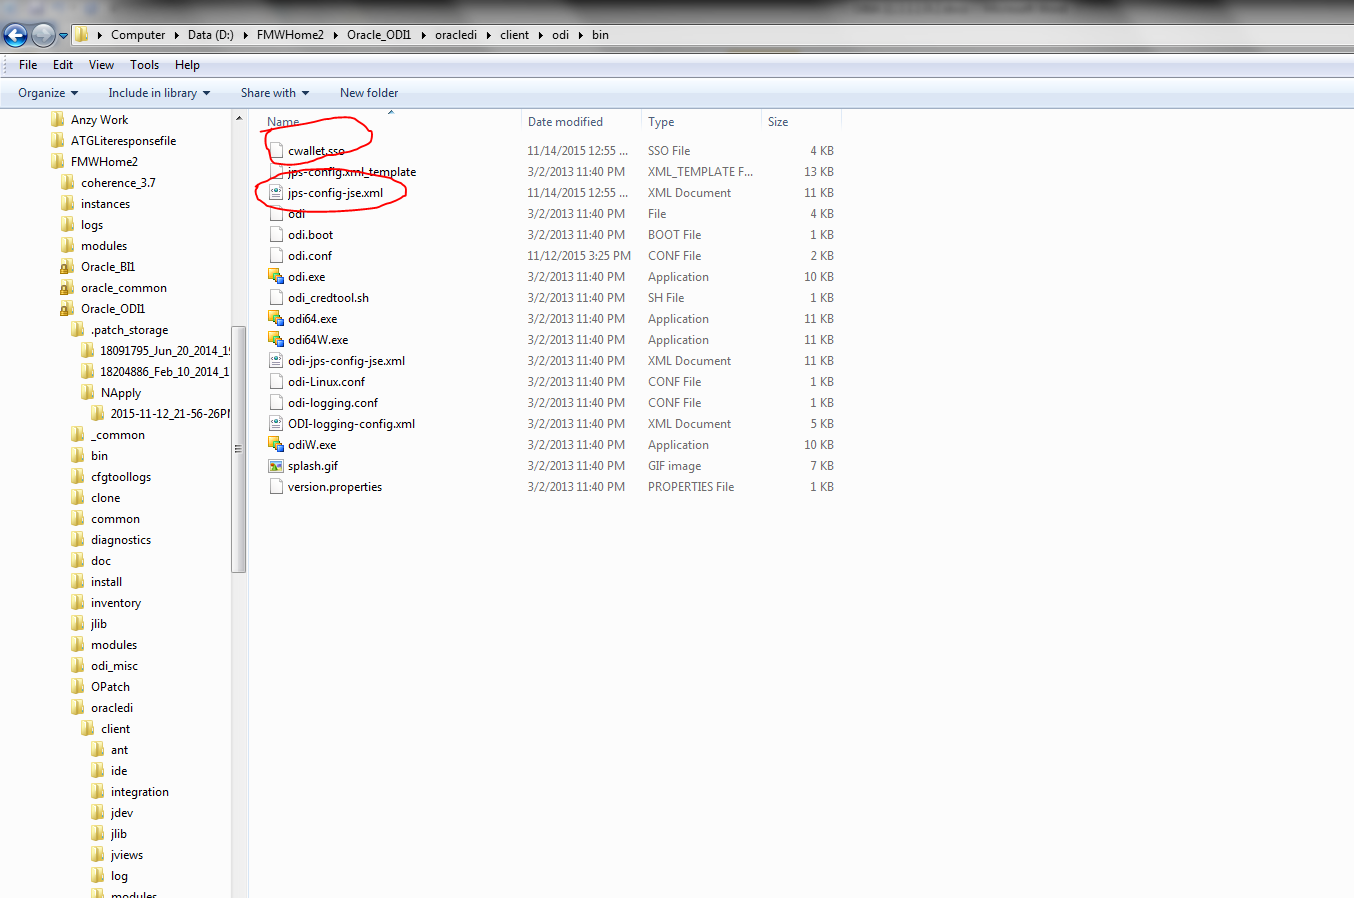
- Copy cwallet.sso and jps-config-jse.xml from:
MW_HOME/user_projects/domains/bifoundation_domain/odi-client-config/embedded
To:
ODI_HOME/oracledi/client/odi/bin
Navigated to this location:
D:\FMWHome2\user_projects\domains\bifoundation_domain\odi-client-config\embedded
And copied cwallet.sso and jps-config-jse.xml
to “D:\FMWHome2\Oracle_ODI1\oracledi\client\odi\bin”

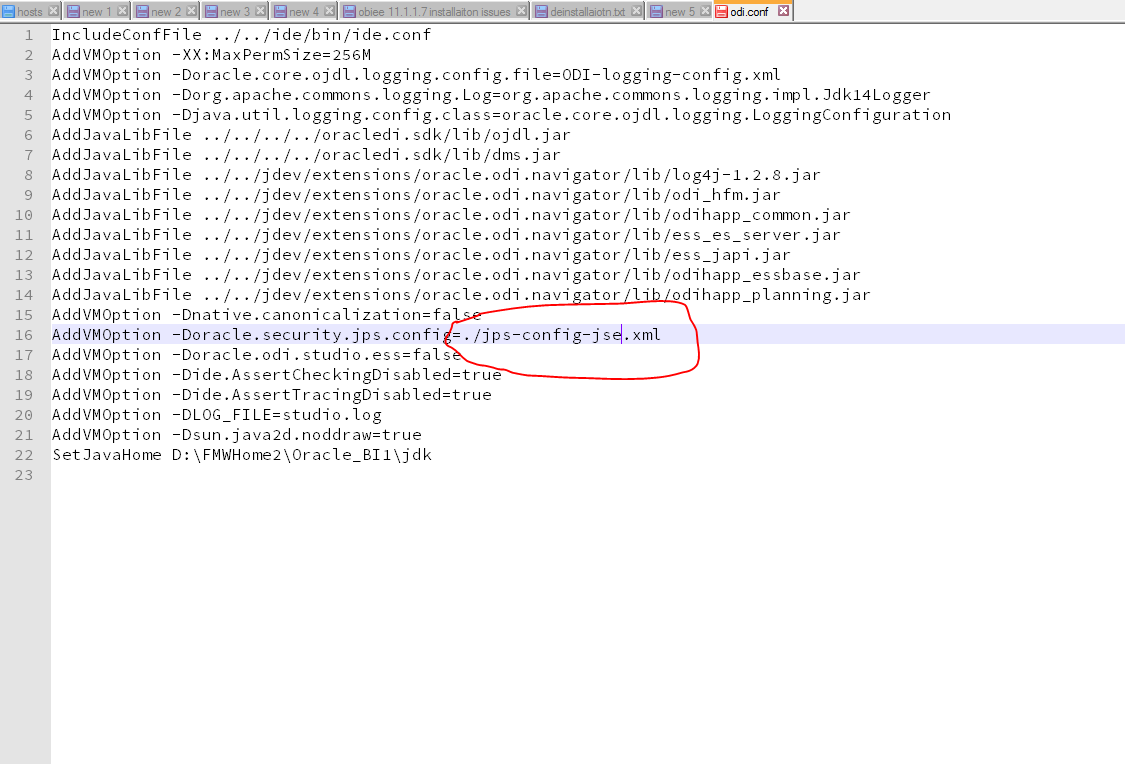
- Edit ODI_HOME/oracledi/client/odi/bin/odi.conf by updating the JPS configuration file name:
- AddVMOption -Doracle.security.jps.config=./jps-config-jse.xml
If you do not successfully complete these steps, you will receive the following error message: ODI-10188: Error while login from OPSS<...>/jps-config.xml (No such file or directory).

- Perform steps 1 and 2 on all instances of ODI Studio.
Note:
You must perform these steps even if ODI Studio has been installed on the system where Oracle Home for BI resides.
- Copying Source Files(Optional)
During installation of Oracle BI Applications, source files are installed in the BI_Oracle_Home/biapps/etl directory. These files are used during the ETL process and will be configured by functional developers. You must copy these files to a location that ODI Agent deployed in WebLogic Server can access but that is outside of the Oracle Home directory; otherwise, when the Oracle BI Applications environment is upgraded or patched, these files will be overwritten.
1. Navigate to the BI_Oracle_Home/biapps/etl directory.
2. Copy all files under the BI_Oracle_Home/biapps/etl directory into a location
that ODI Agent deployed in WebLogic Server can access but is outside of the
Oracle Home directory.
Note these points:
• Avoid copying the files to a location with a long directory path.
• Do not put the files under the ODI Home directory.
• Depending on your deployment, there may be files in the BI_Oracle_Home/biapps/etl directory that you will not use.
Performing Post-Installation System Setup Tasks
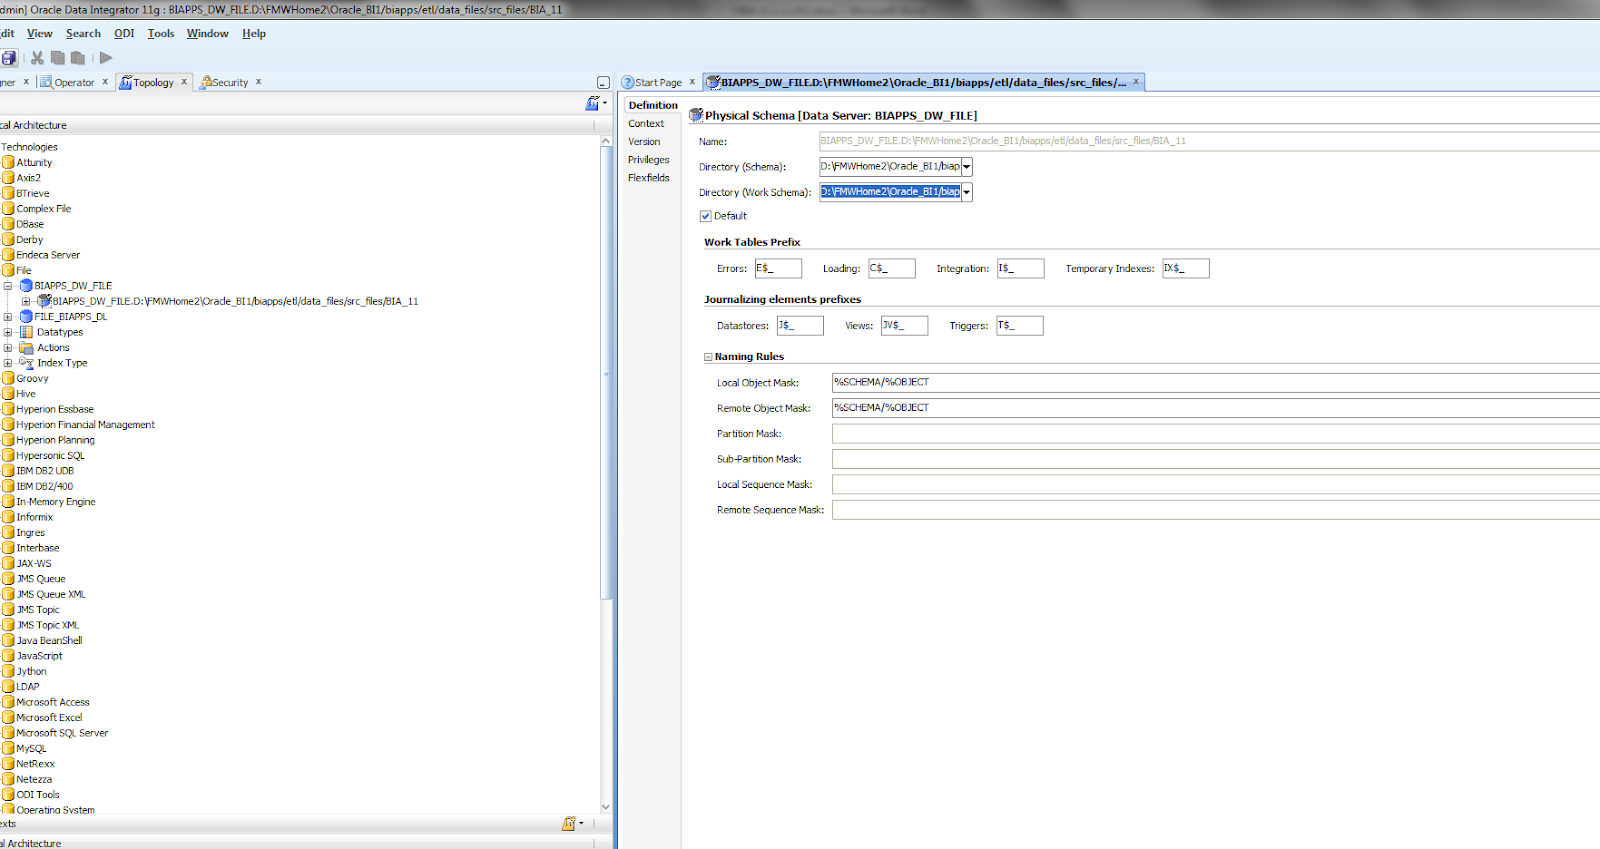
- Setting the Business Analytics Warehouse Connection in Oracle Data Integrator
jdbc:oracle:thin:@localhost:1521:orcl12c


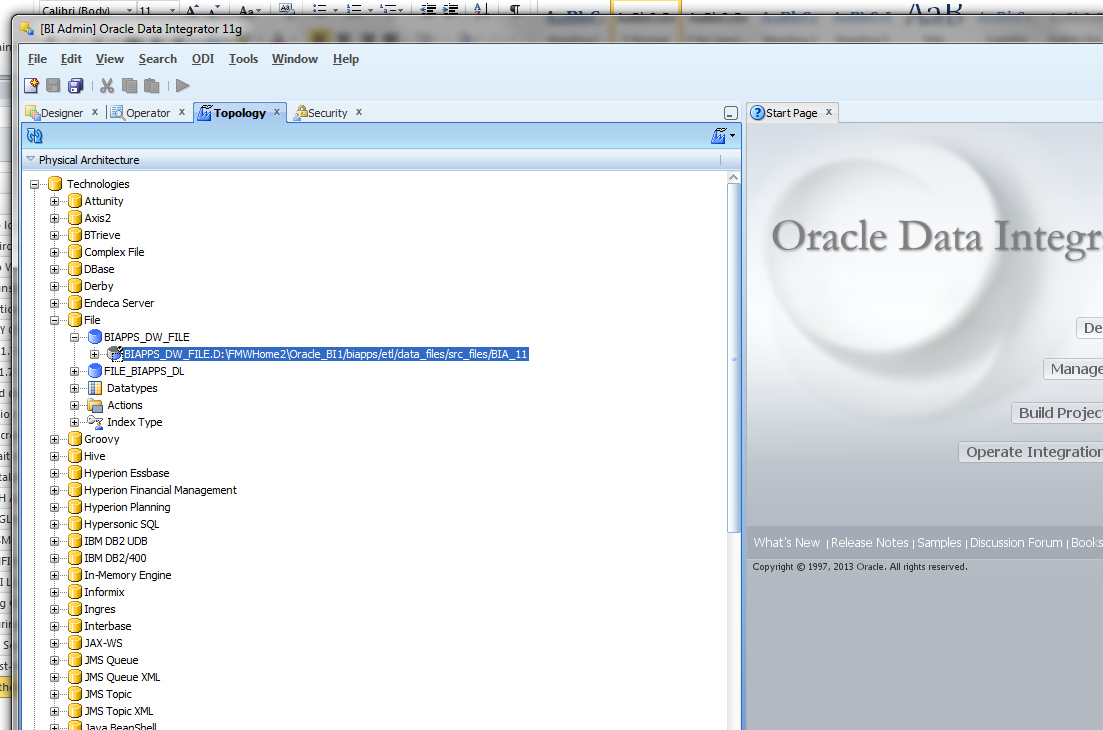
After logging in Navigate to the Topology tab highlighted below:

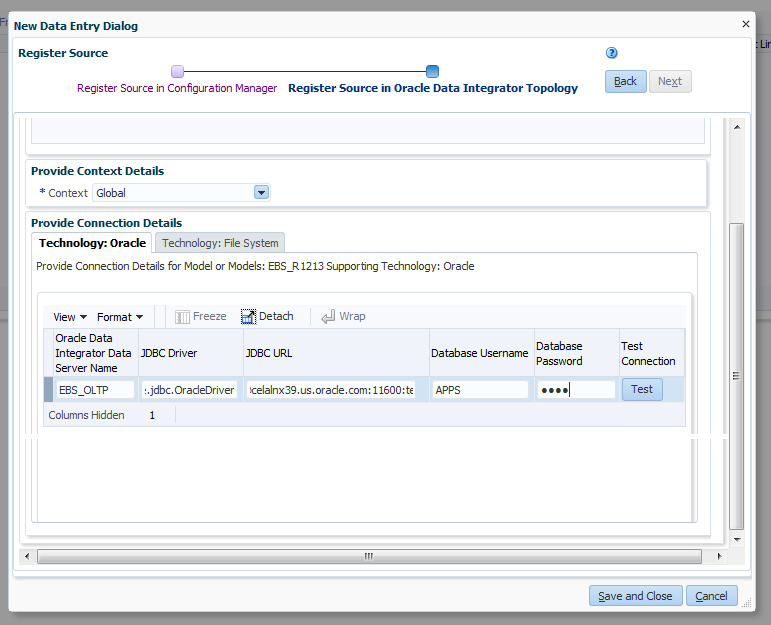
- Registering Source Systems and Propagating Connection Details to Oracle Data Integrator
Use this procedure to register a source system and propagate the connection details to
Oracle Data Integrator.
To register a source system:
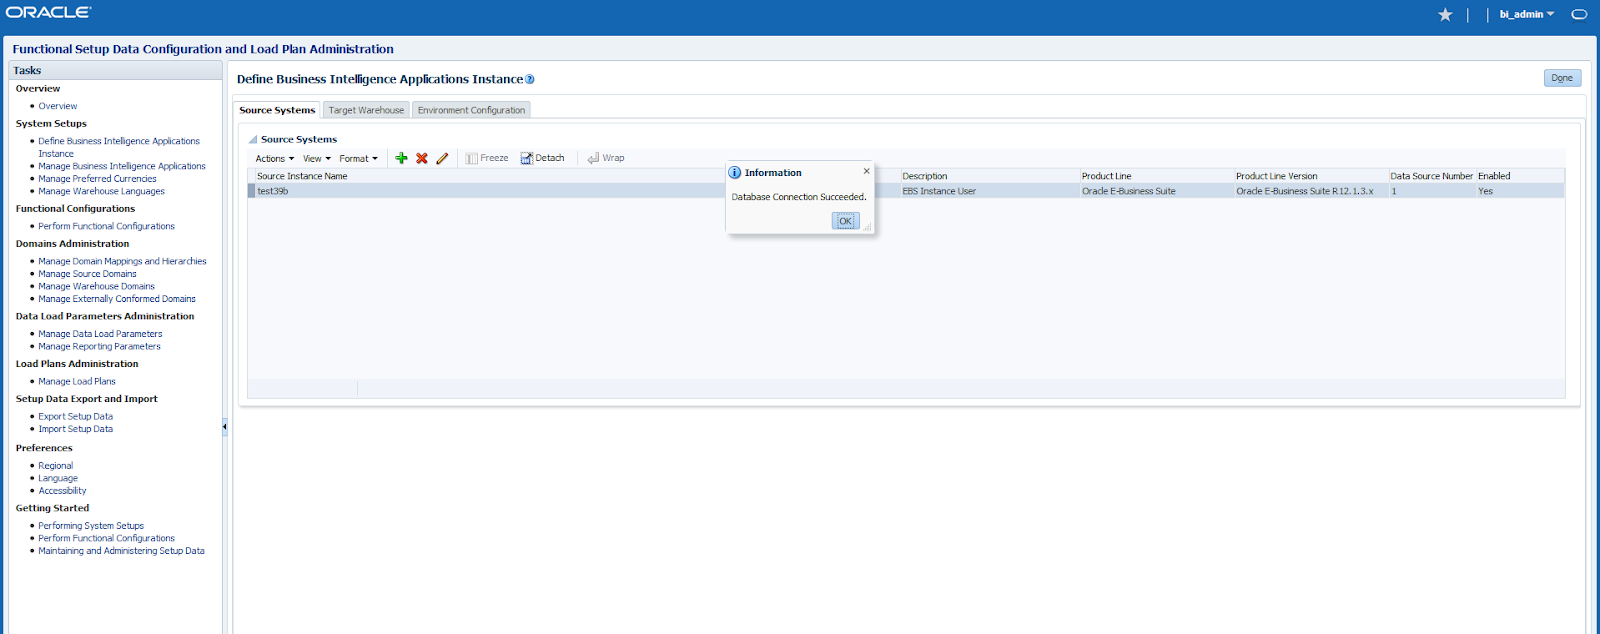
1. Launch Oracle BI Applications Configuration Manager using the URL http://


2. In the navigation pane, select the Define Business Intelligence Applications Instance link, which appears under System Setups.
The Source Systems tab is displayed.

3. Click the Add icon.
The Register Source dialog displays.

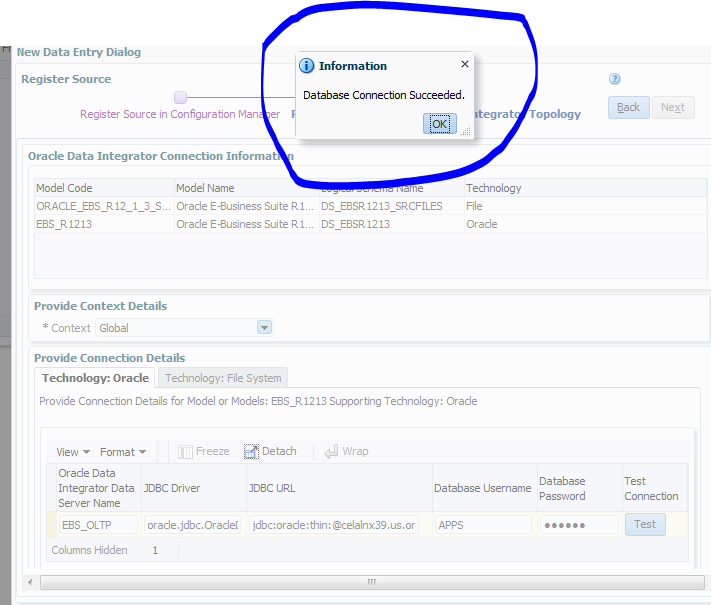


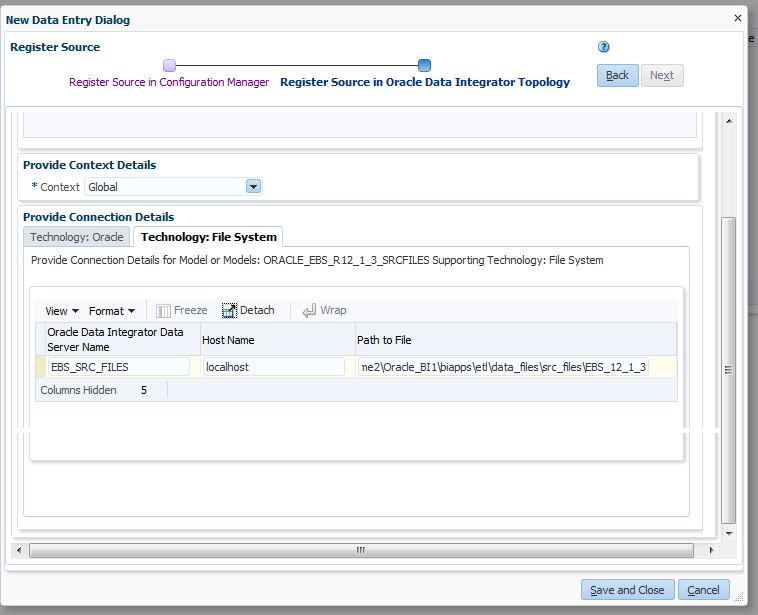
After this click the save and close button and after that the below screen appears:
Now logging to ODI Studio and navigate to Topology tab. This time I faced an issue as given below ; It didn’t allowed me to login:
Issue :
oracle.odi.core.security.BadCredentialsException: ODI-10199: Incorrect ODI username or password.
oracle.security.jps.JpsRuntimeException: JPS-01520: Cannot initialize identity store, cause: oracle.security.jps.service.idstore.IdentityStoreException: JPS-01520: Cannot initialize identity store, cause: oracle.security.idm.ConfigurationException: javax.naming.CommunicationException: AMEERASA-LAP.in.oracle.com:7001 [Root exception is java.net.ConnectException: Connection refused: connect]..
Solution :
I didn’t do much. But did a full restart after checking the config file in odi client location and verifying it for the same.
After logging in navigate to topology page. The changes that we have done in the biacm config manger should be reflected here.

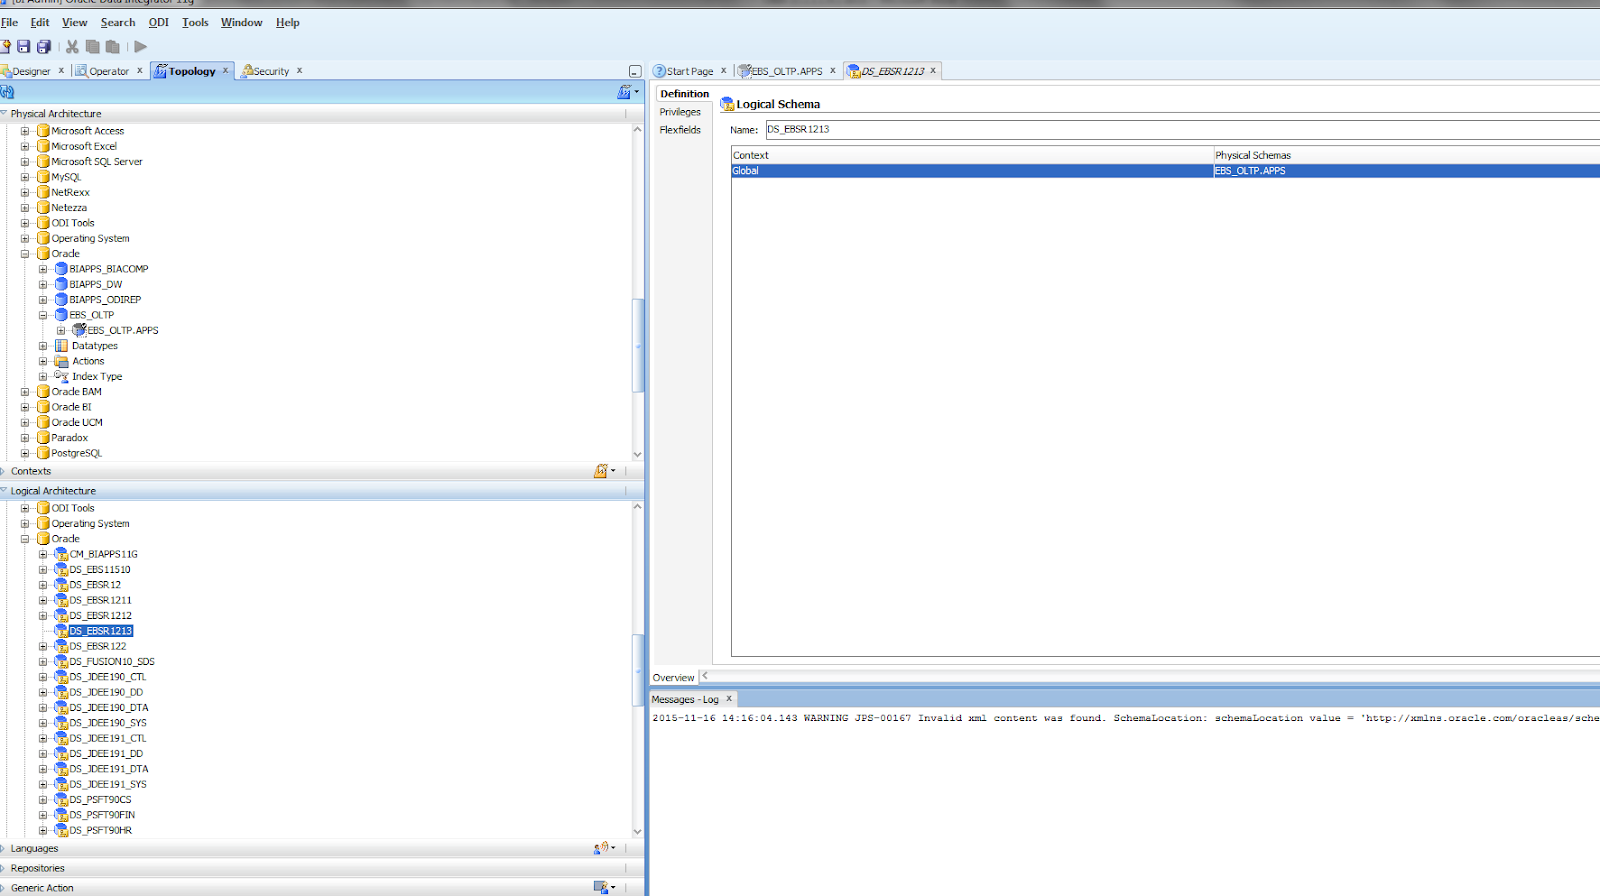
Select the appropriate value from the drop down.

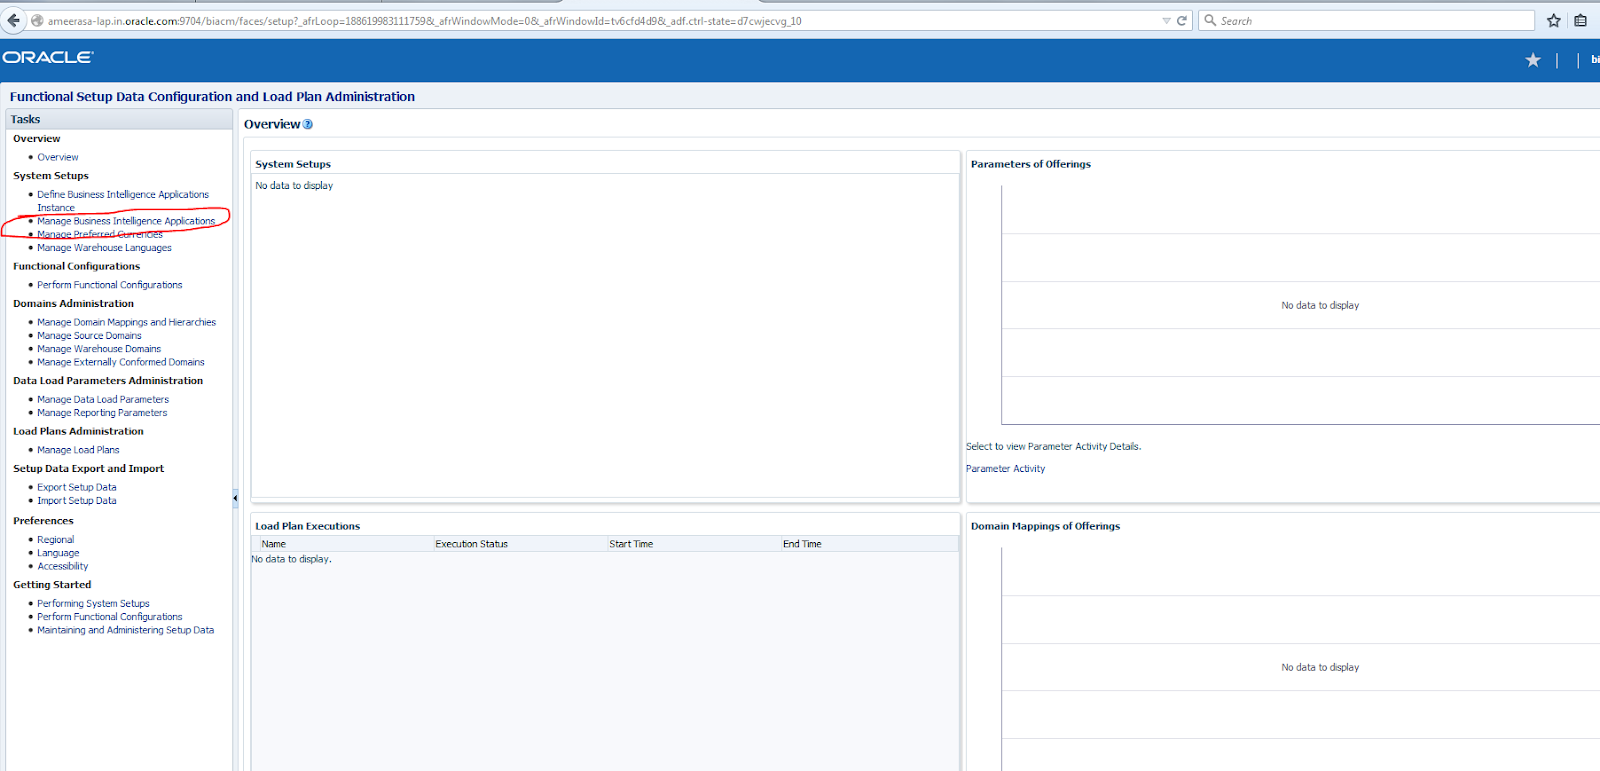
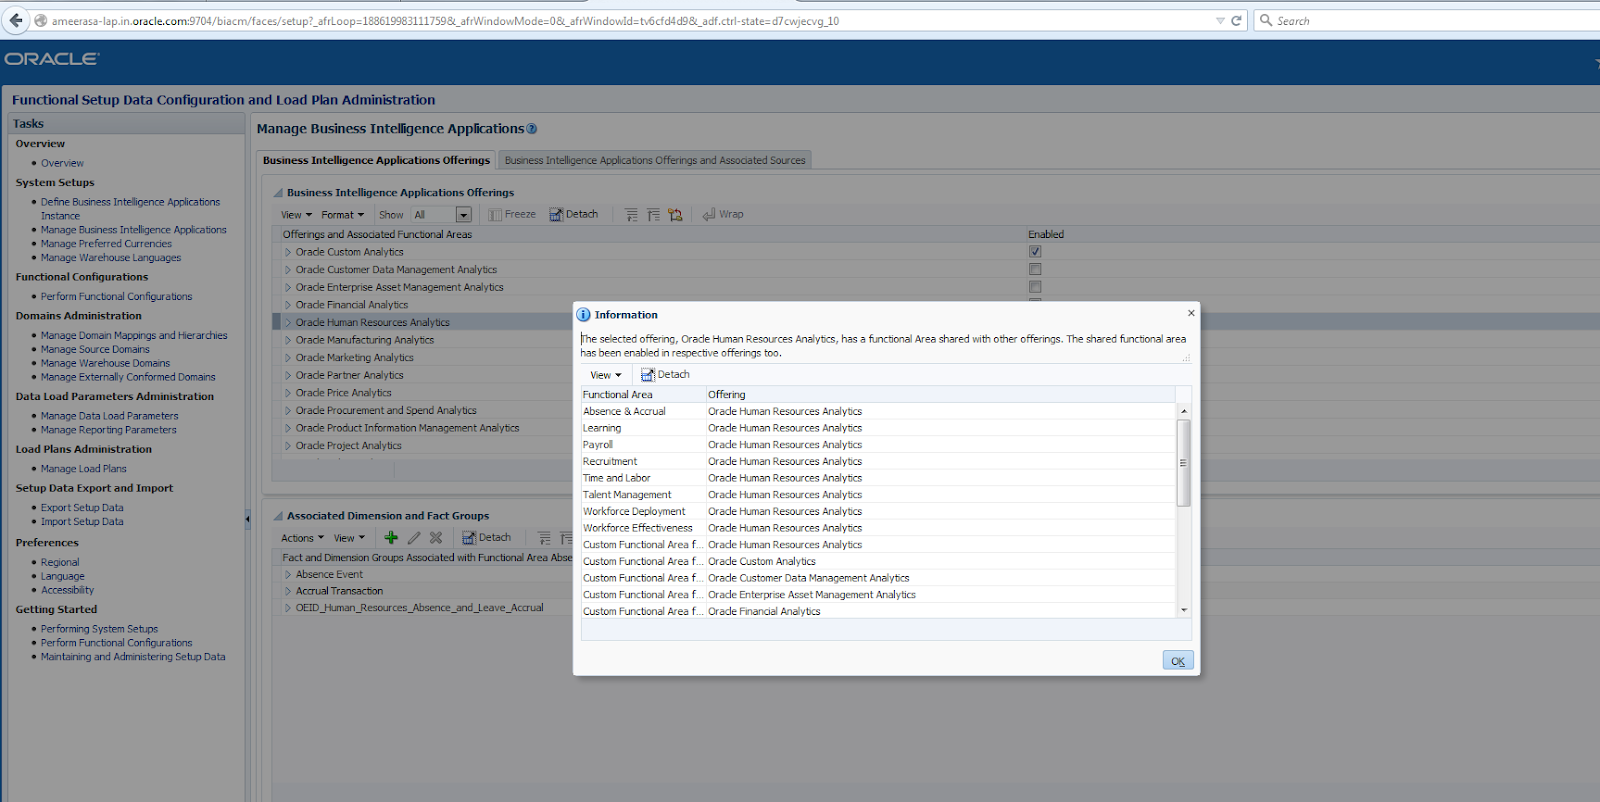
- Enabling Offerings for Deployment (basically selecting the verticals)
Use Oracle BI Applications Configuration Manager to enable the Oracle BI Applications offerings that you have purchased and are deploying. The setup data relating to offerings is made visible in Configuration Manager when you enable the offering.
By default, if you have multiple source instances and you enable an offering, the offering is enabled for all source instances. If an offering won't source from all source instances, then you can disable the source instances from which the offering won't source. For example, suppose you have two source instances, Oracle EBS and PeopleSoft, and you are deploying Financial Analytics. If Financial Analytics will only source from PeopleSoft, then you would disable the Oracle EBS source instance for the Financial Analytics offering.
To enable Oracle BI Applications offerings for deployment:
Click on save after this:
Click Done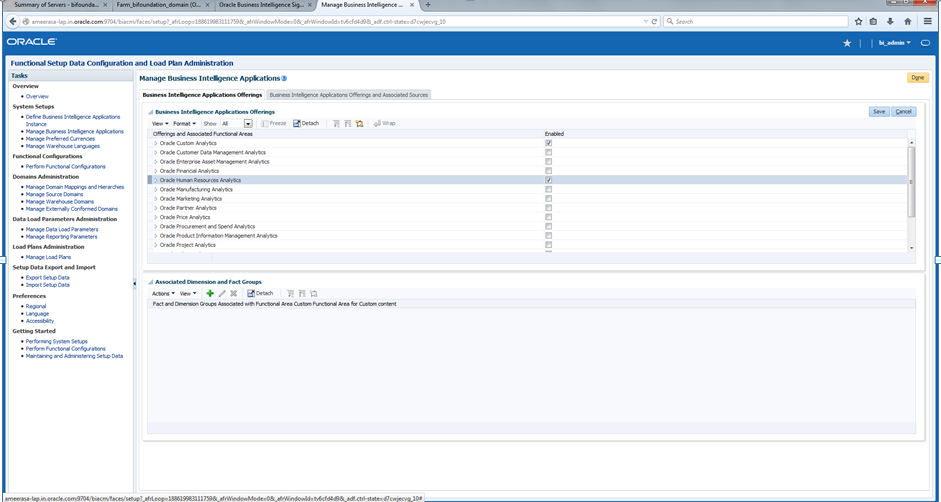

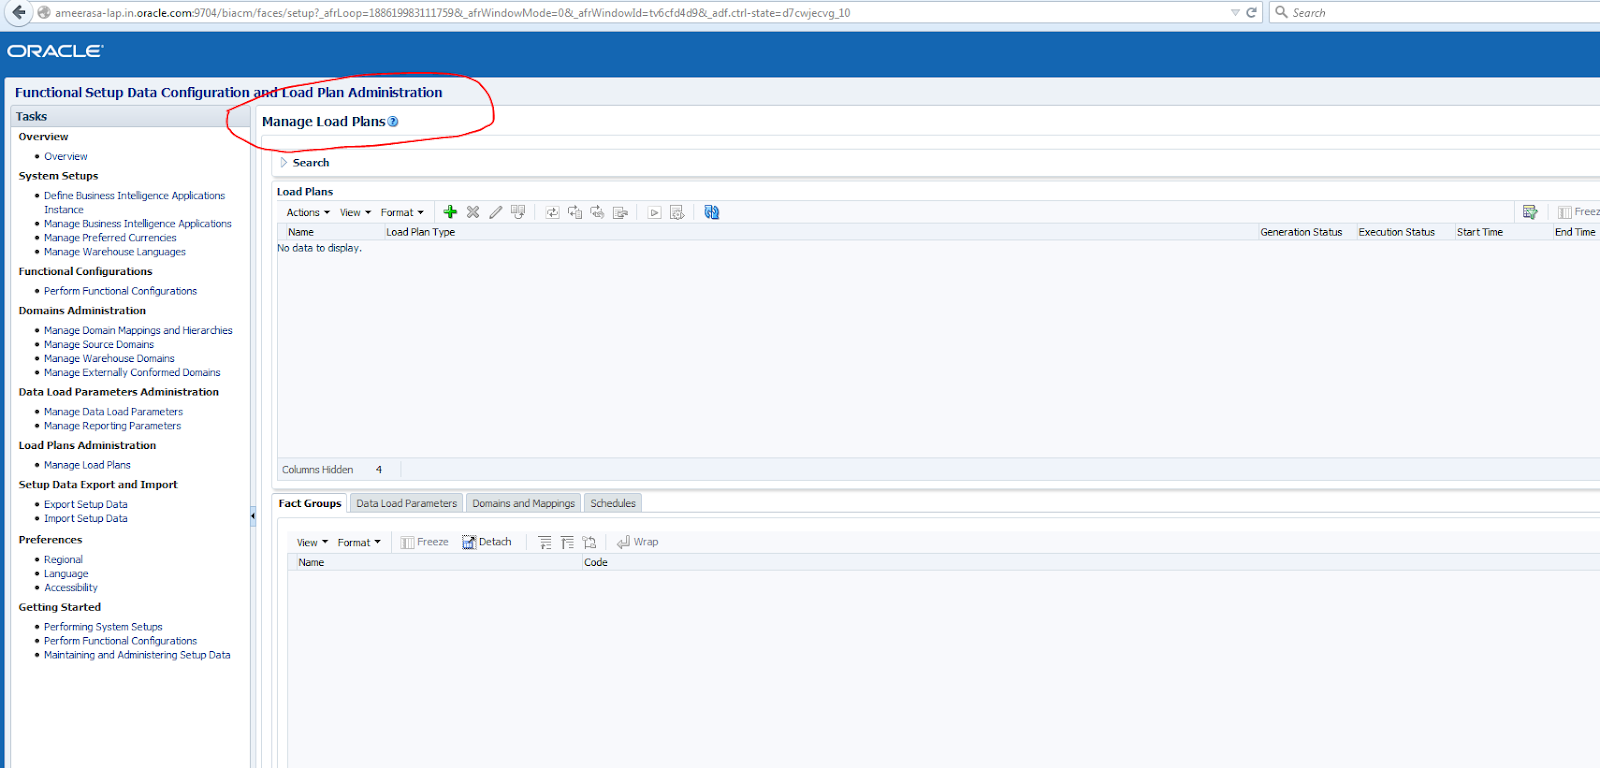
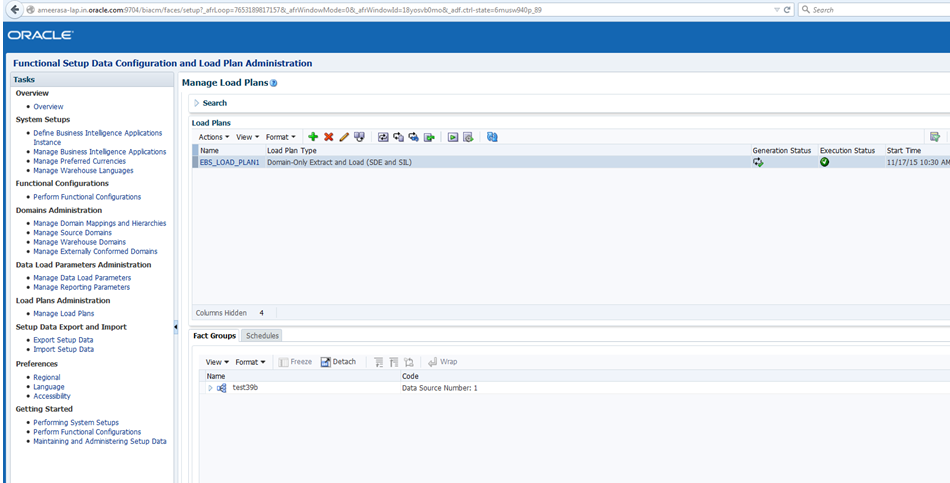
- Running the Domains Load Plan
Click on Mange Load plans as highlighted below:
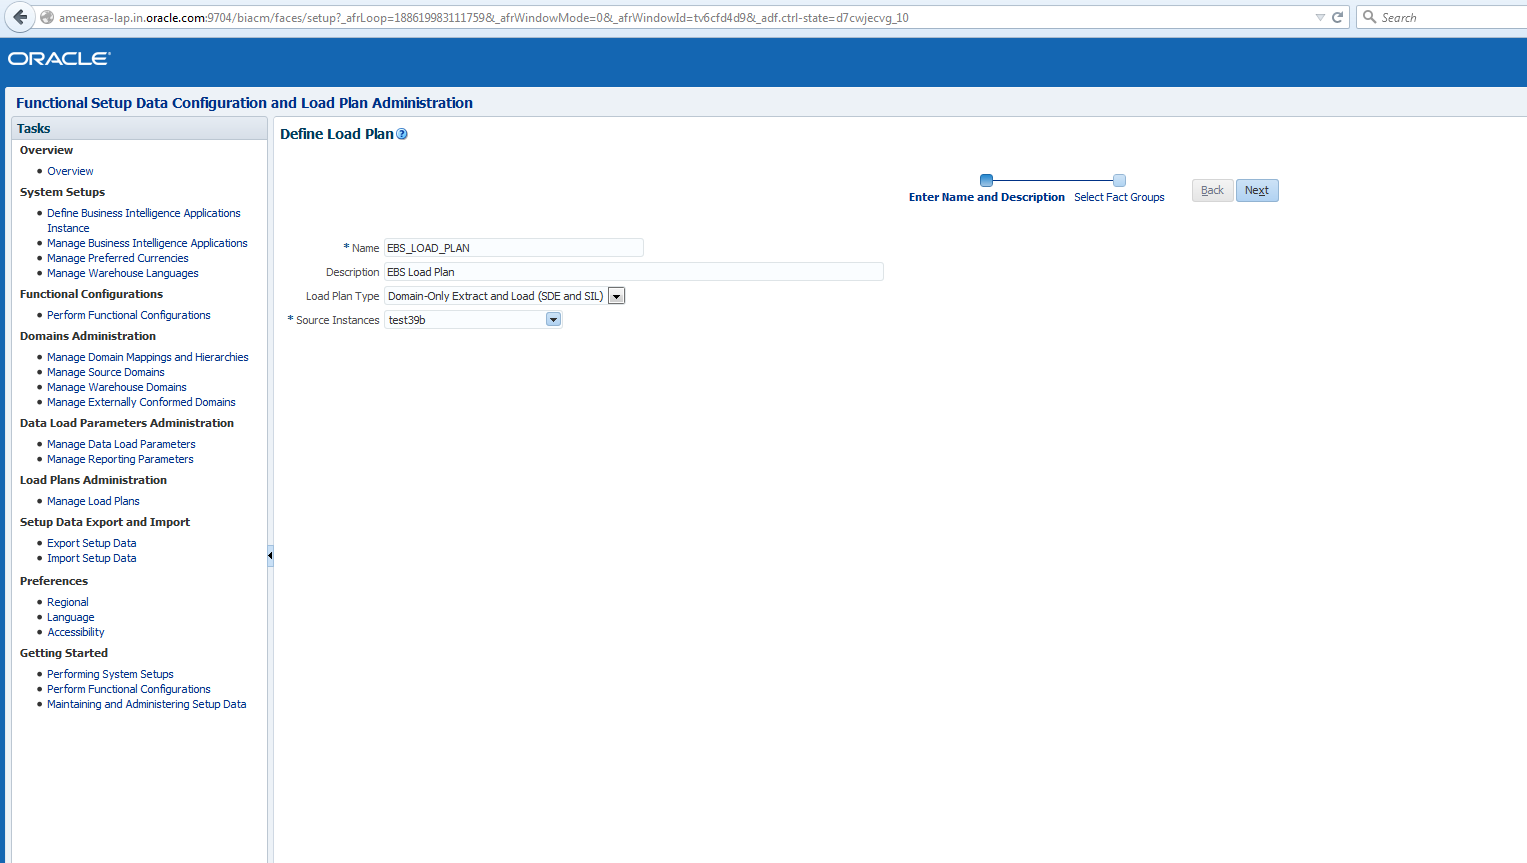
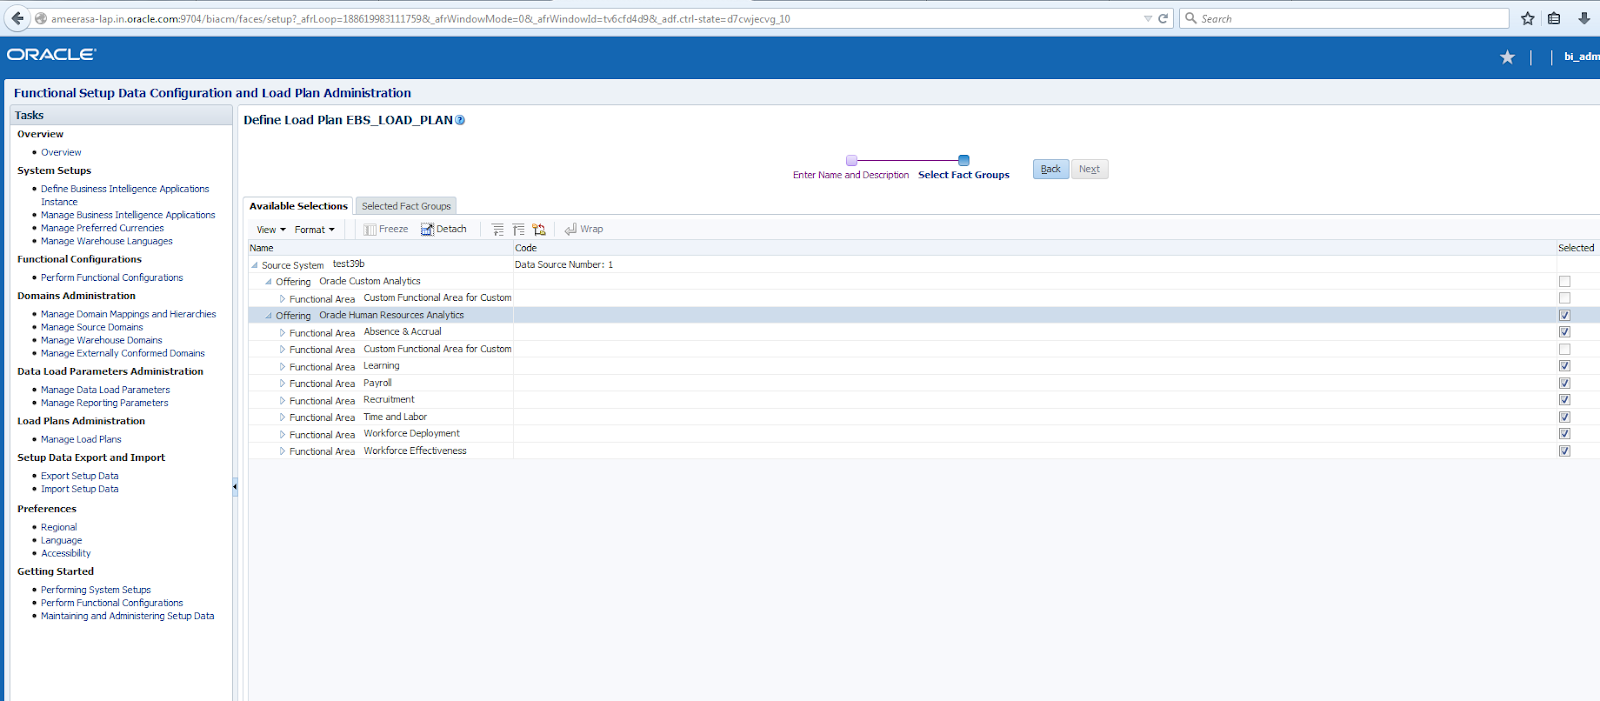
Click save

Now generate the plan that you saved:
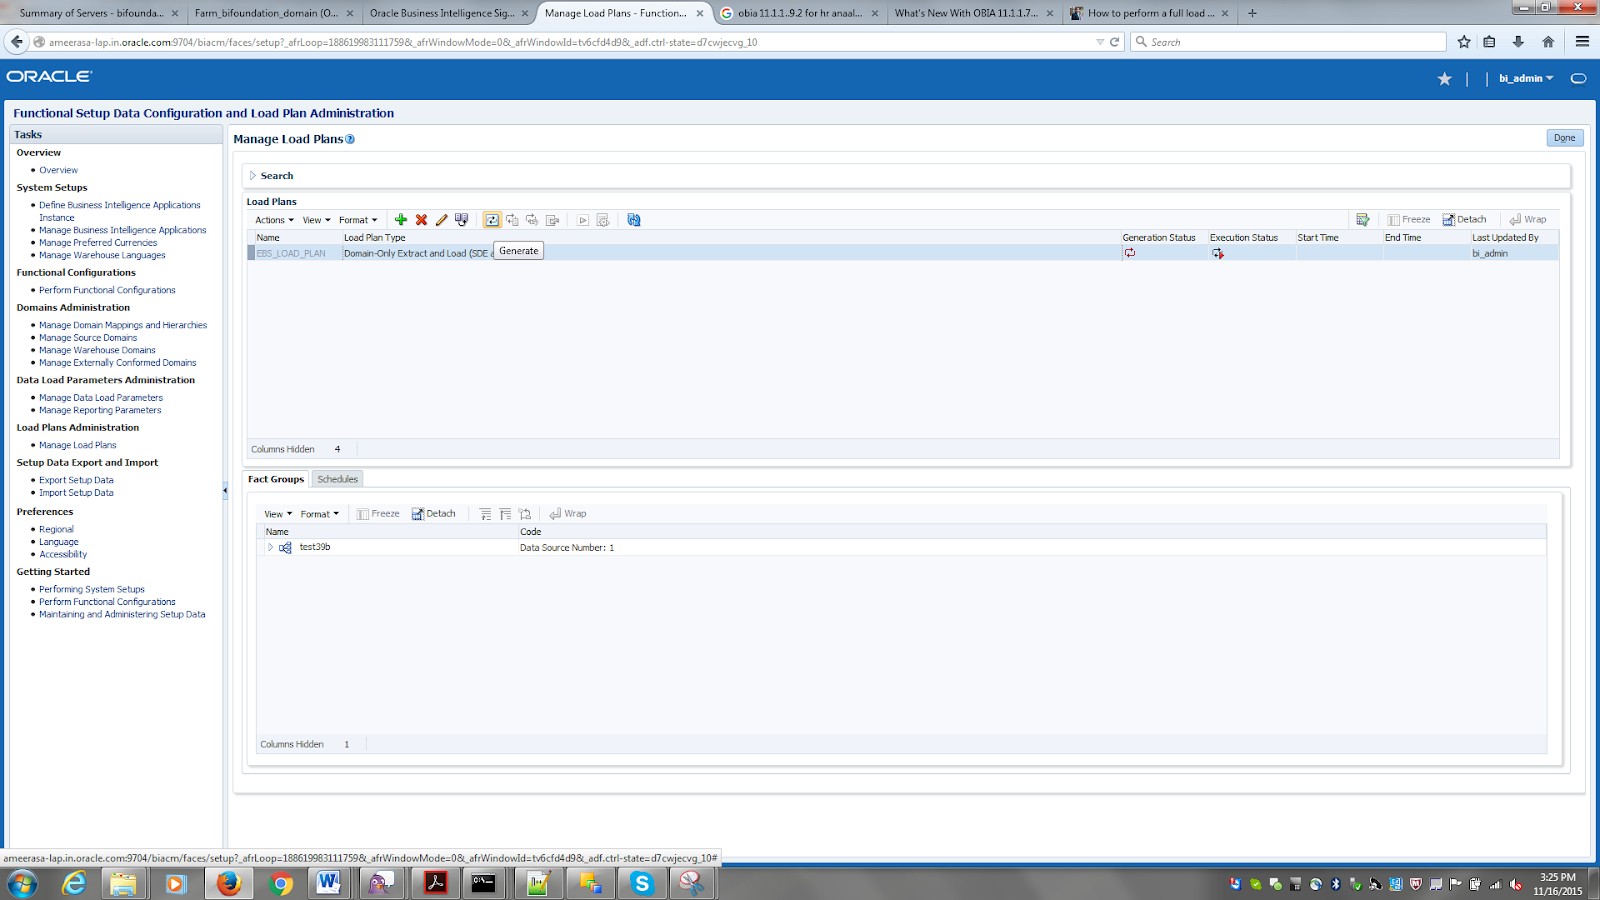
Check the generation status:
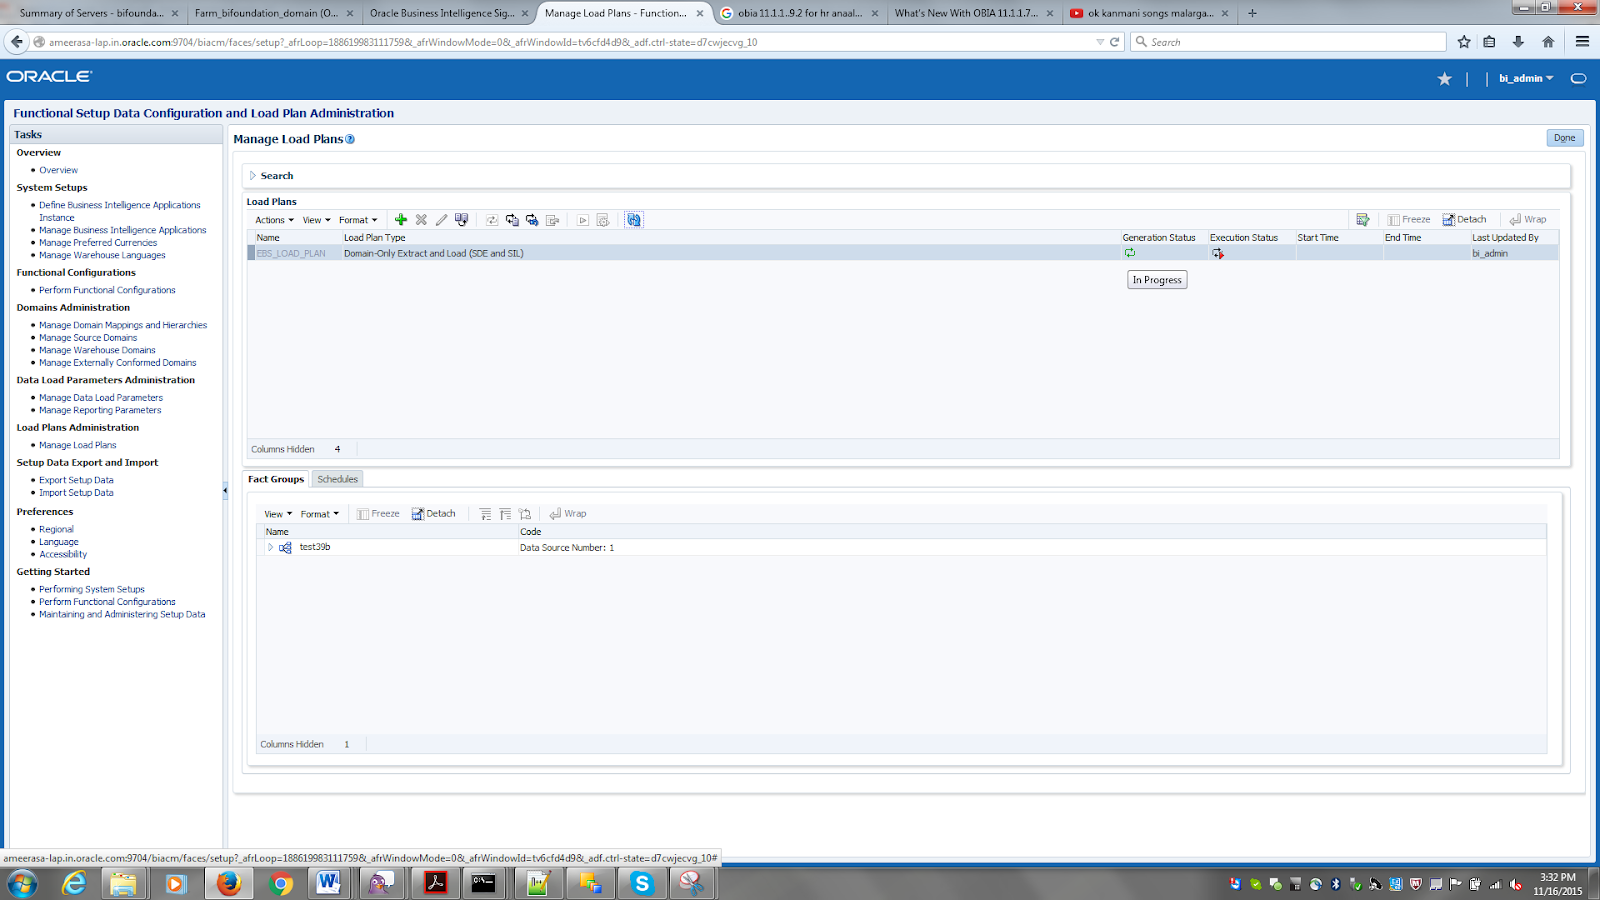

Now that the Load plan is successfully generated we can kick start of the load plan execution:

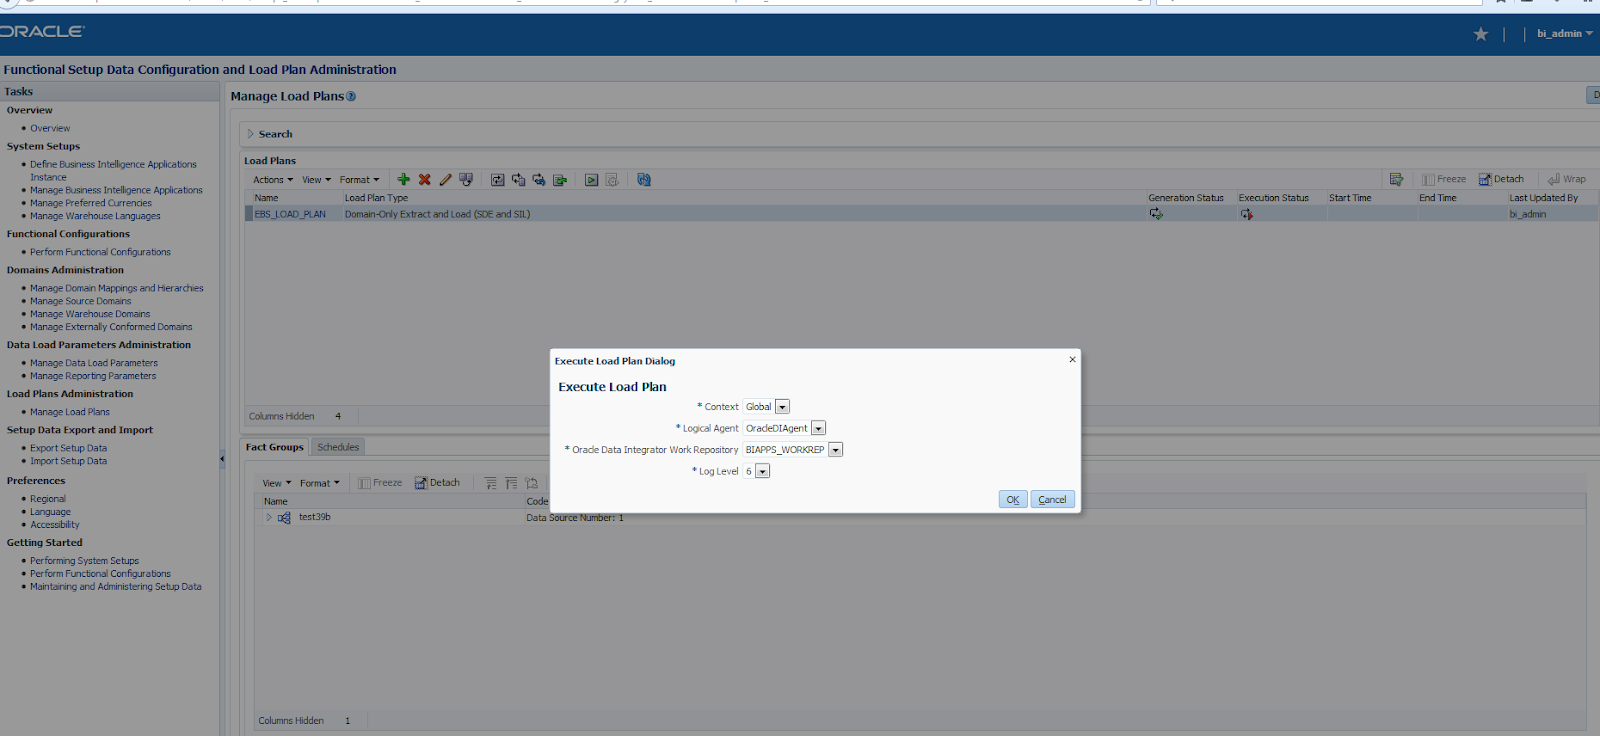
The below user name and password should be the biacm user and password;ie bi_admin/welcome1 in my case

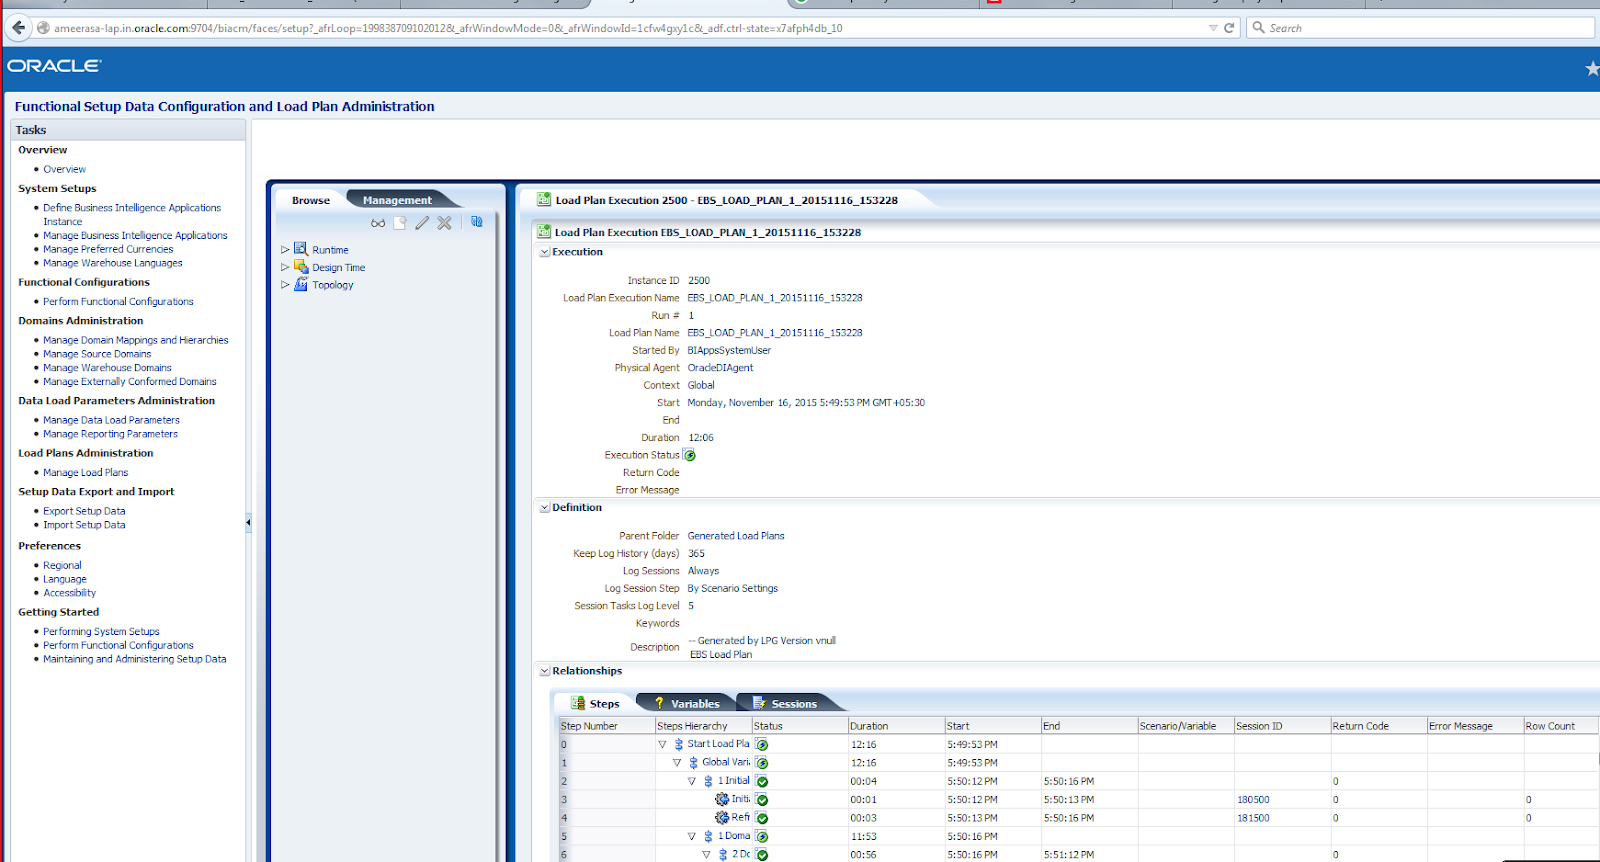
Execution plan is success
Extracted the HR Project alone from the RPD to reduce the rpd size(Optional)
I wanted to reduce the huge rpd size and keep only the HR project module in BI Apps rpd so I ran the extract projects utility as given below:

Command:
Invoke the command form the bi-init window as given in the below screenshot.
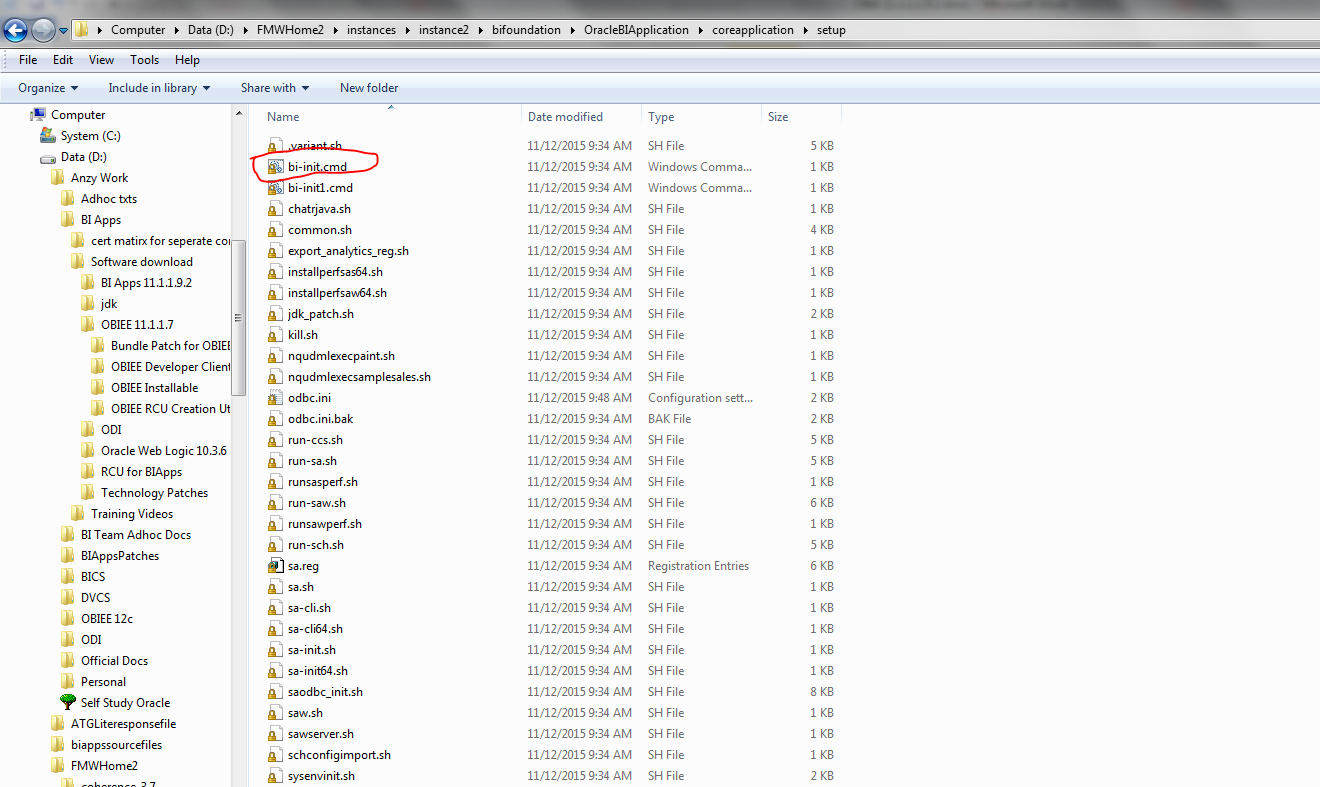
extractprojects -B D:\FMWHome2\instances\instance2\bifoundation\OracleBIServerComponent\coreapplication_obis1\repository\OracleBIApps.rpd -O D:\FMWHome2\instances\instance2\bifoundation\OracleBIServerComponent\coreapplication_obis1\repository\OracleBIApps_udu2.rpd -I "Human Resources Analytics Fusion Edition" -I DataLineage_Project –L
Since I had space in my rpd name gave it inside double quotes
Nice blog. It helped me to install end to end OBIA.........
ReplyDeleteThankssssssss
Hi can you help out with ATG step, where do i run the sql? in BIACOMP schema? please reply me at tejachowdary.obiee@gmail.com
ReplyDeleteHi nice blog. It's help full me. I have one doubt , it's support OBIEE 11.1.1.9.0 ? . which patch is required for when we go for OBIEE 11.1.1.9.0
ReplyDeleteSplendid!
ReplyDelete
ReplyDeleteSimply wish to say your article is as astonishing. The clarity in your post is simply great, and I could assume you are an expert on this subject. Same as your blog i found another one Oracle Project Portfolio Management Cloud Software .Actually I was looking for the same information on internet for Oracle PPM and came across your blog. I am impressed by the information that you have on this blog. Thanks a million and please keep up the gratifying work.